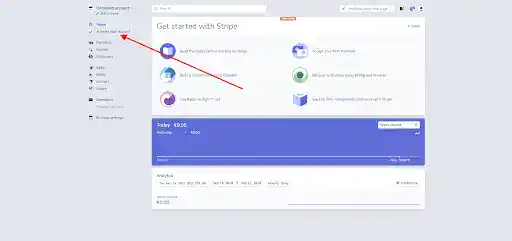
- Go to app.zeevou.com
- Enter your email and password.
Note: After logging in successfully, we recommend bookmarking the login page for quick access in the future. This will save you time when you need to access your account swiftly.
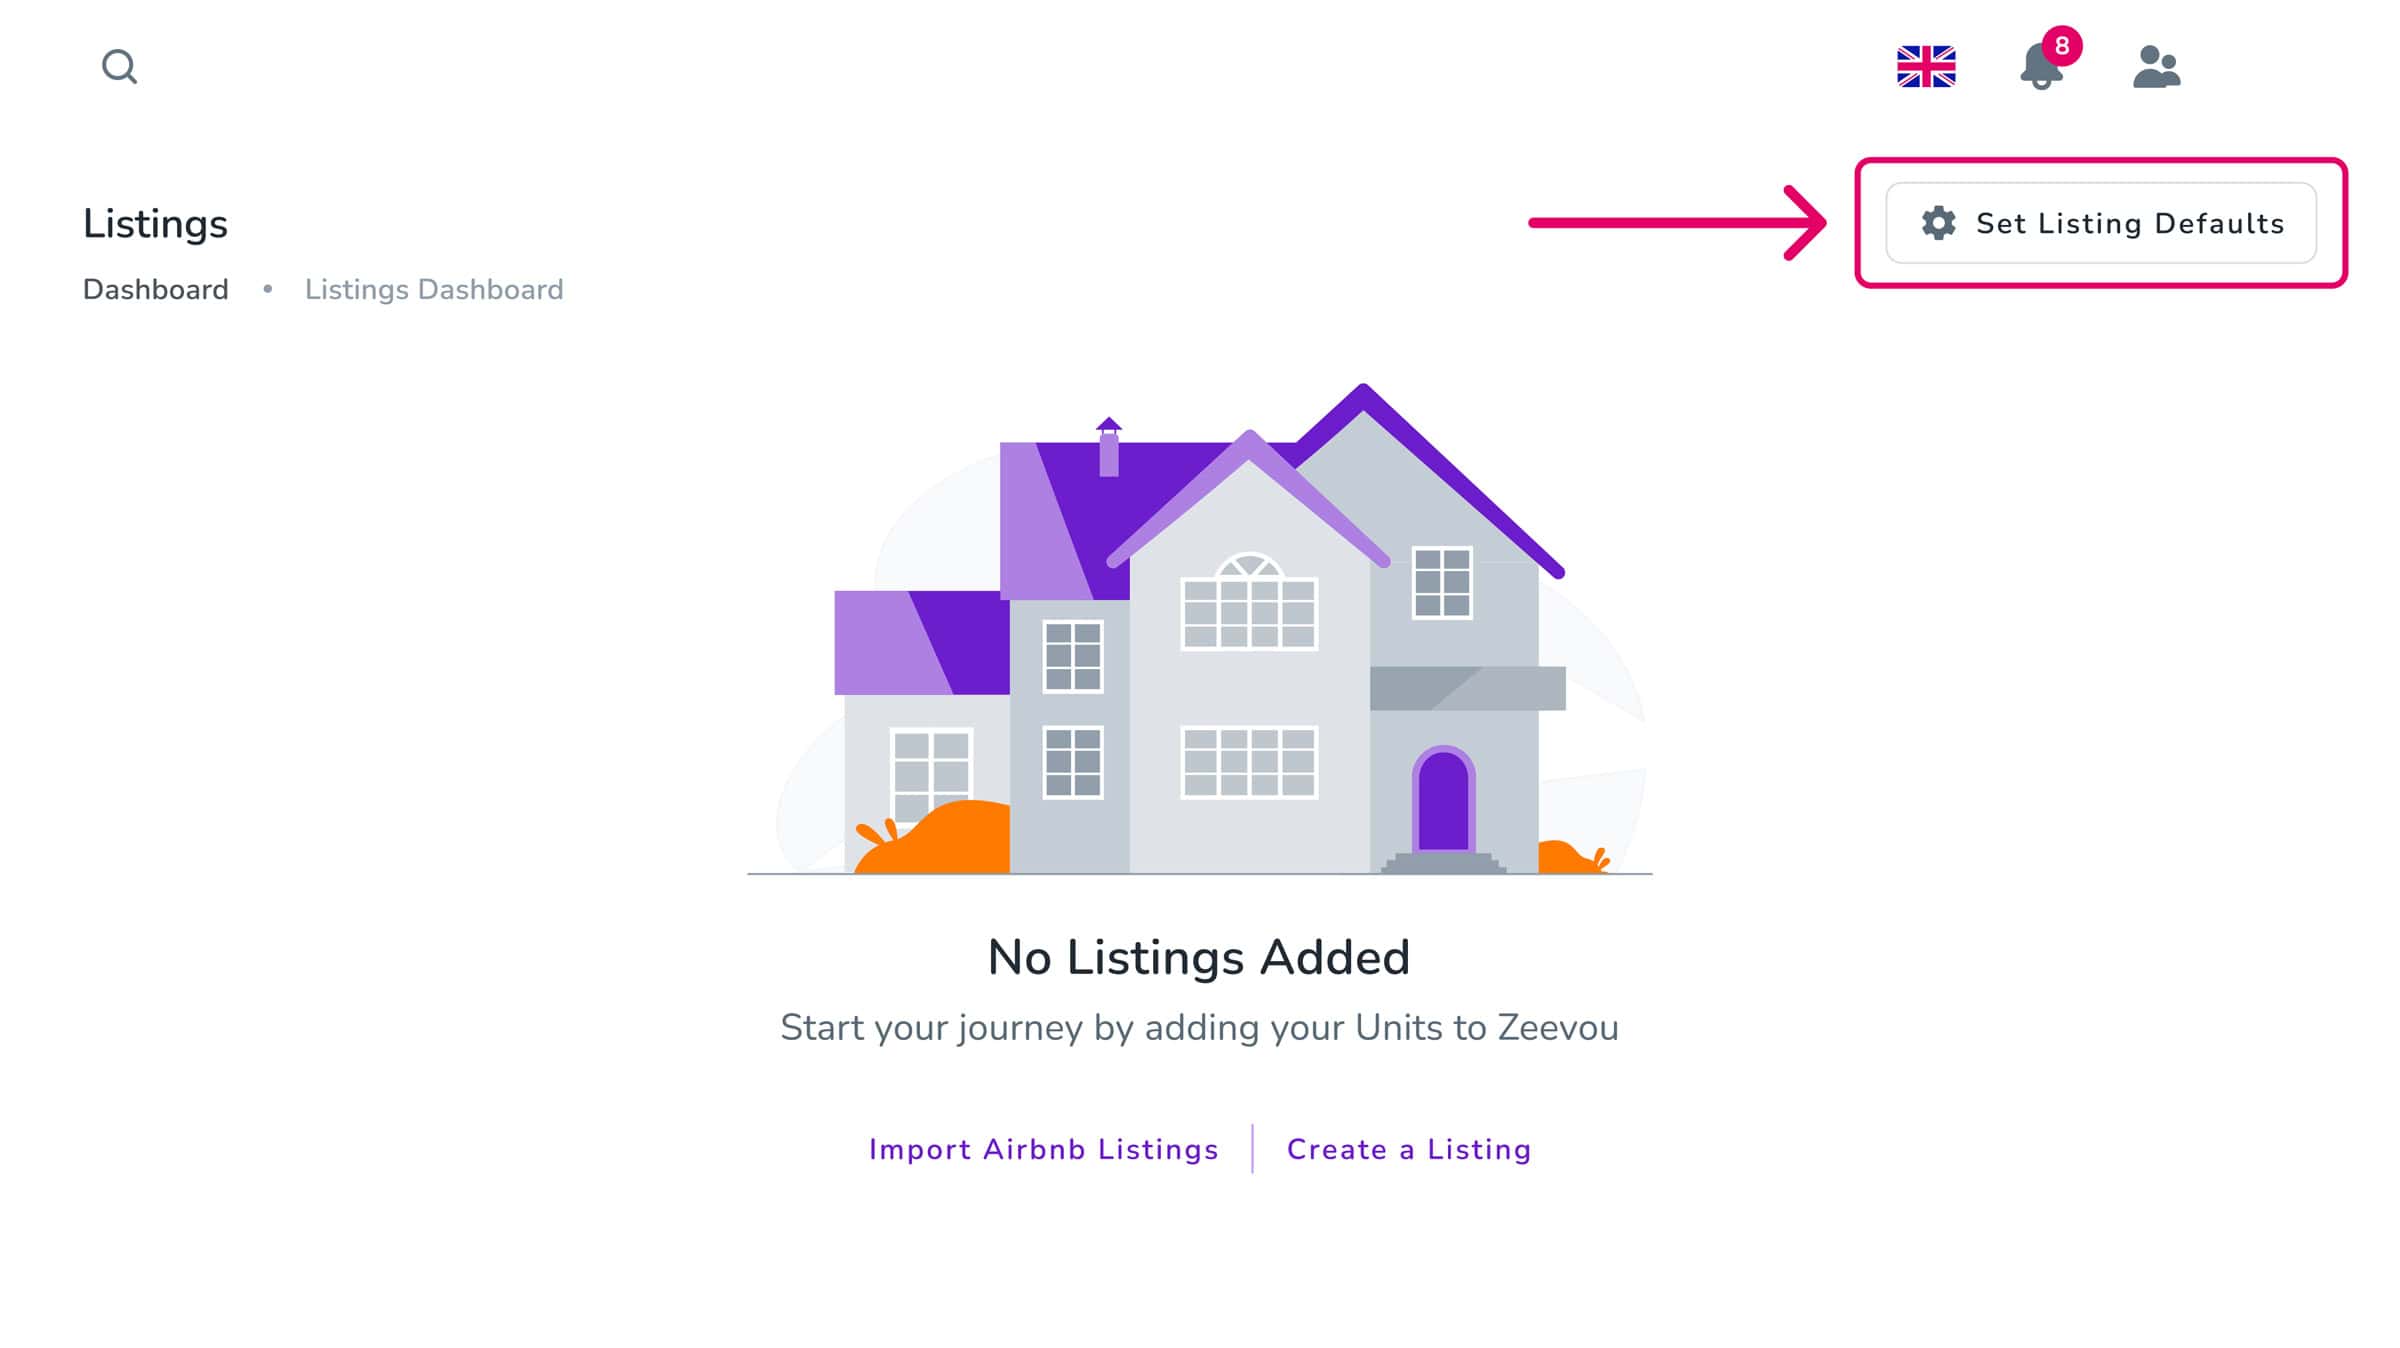
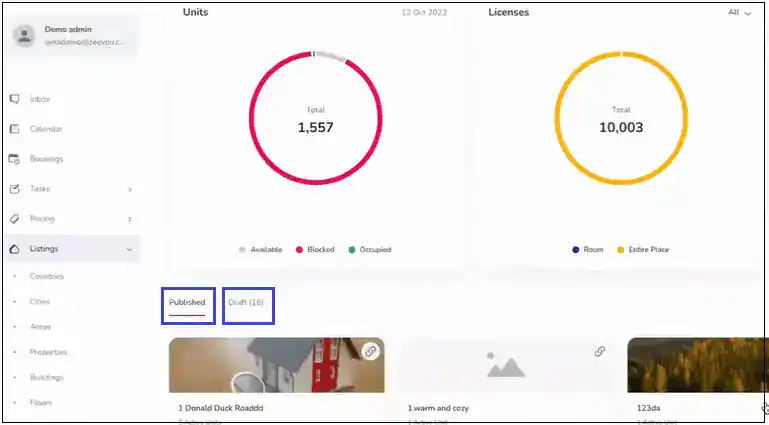
As you know, you need to add all your listings to the system. But before adding them, you can consider using Set Listing Defaults to simplify the process.
You can set default values for new Listings without affecting existing ones. To do so, go to the Listings Dashboard from the menu and then click on Set Listing Defaults.
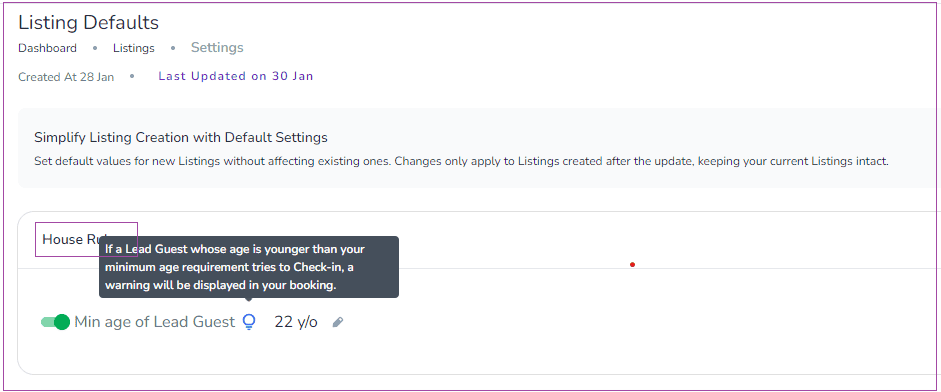
On the House Rules card, you can turn on the toggle of Mid Age of Lead Guest.
On the Check-in & Check-out time card, you can set your desired times for your guests during the Booking Confirmation Process so that they can see the fees for the paid time slots and select them.
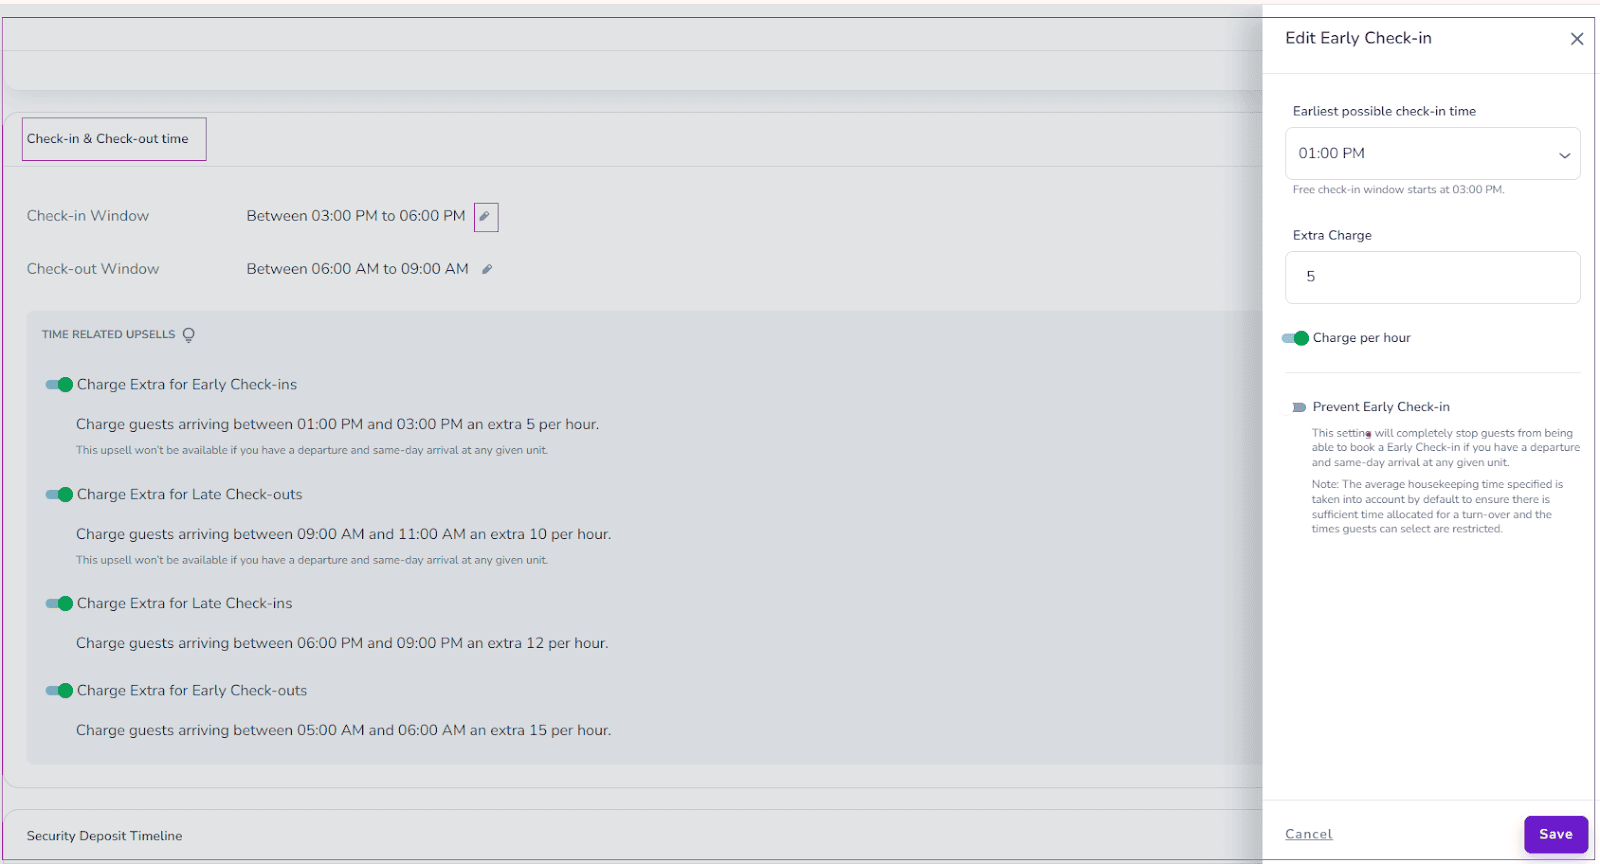
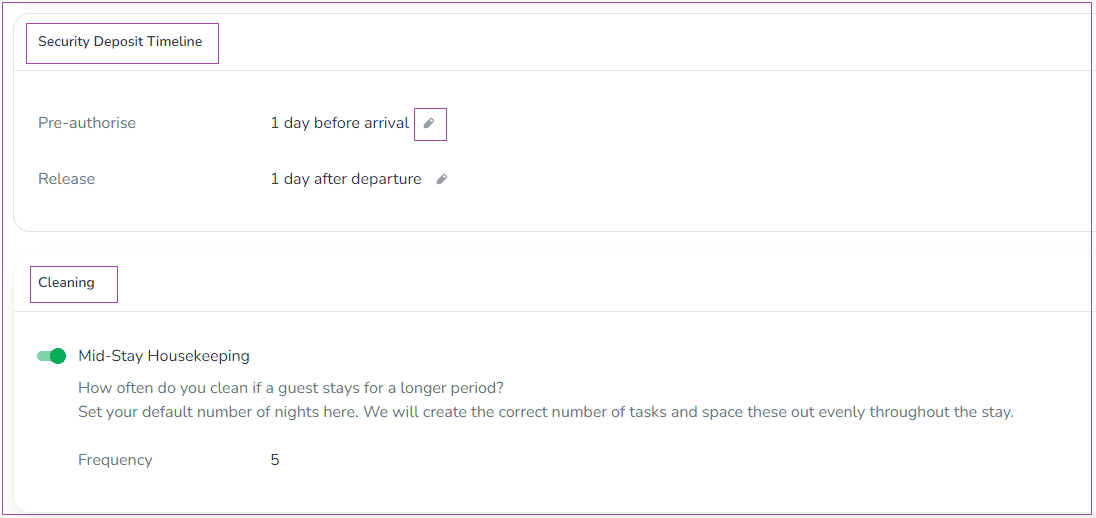
On the Security Deposit Timeline card, you can set Pre-authorisation and Release time of Security Deposit. Note that you can only pre-authorise a security deposit if a card has been saved on the Guest Profile or the guest enters their details through the link.
On the Cleaning card, you can turn on the toggle of Mid-stay Housekeeping to set the Frequency with a default number of nights to create the correct number of tasks and space these out evenly throughout the stay.
Note that all the changes you make for Listing Defaults, will only apply to Listings that are created or imported after this update, ensuring that your existing Listings remain unaffected.
a) If you already have an Airbnb listing, please follow the instructions below:
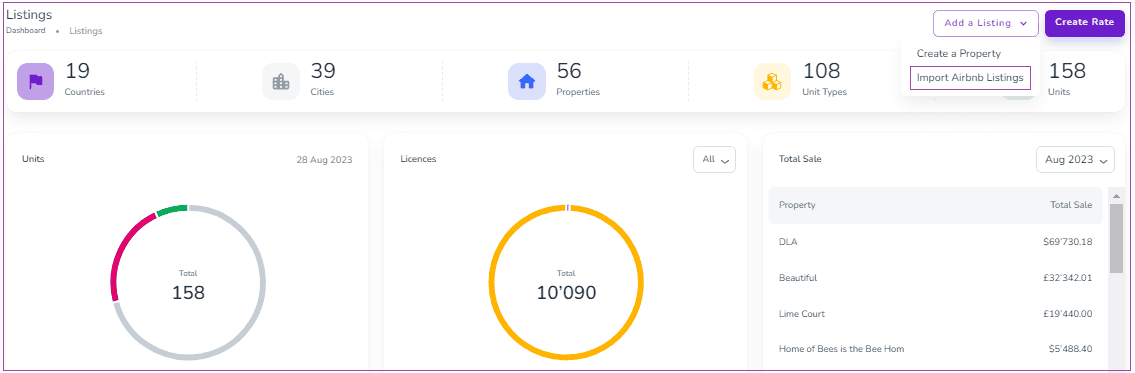
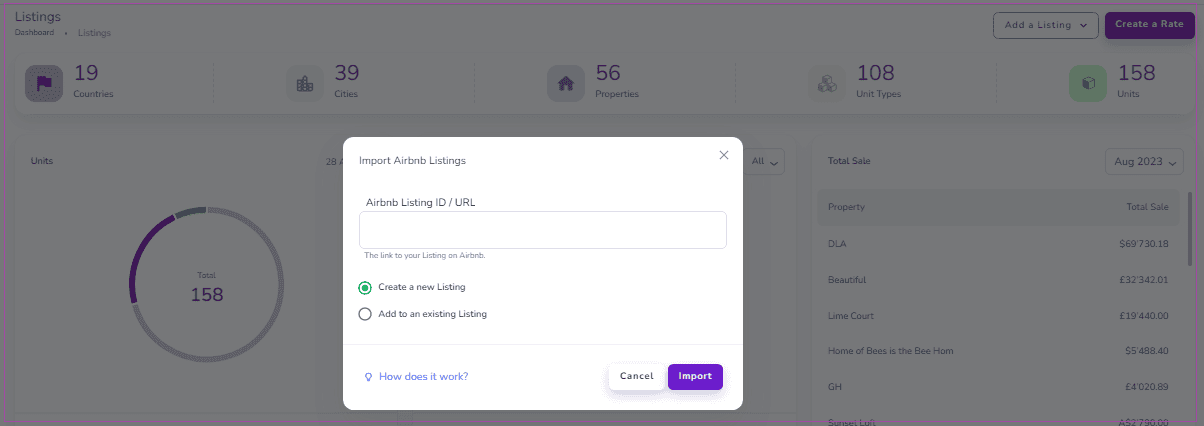
You can import listings from Airbnb directly instead of creating them manually. To do so, click on Add a Listing and select the Import Airbnb Listings button on the top right corner. Then, a window will open for you to paste the Airbnb URL/ID. Then, click on Import.
Next, a wizard tab will appear. Although each listing will be imported automatically, you will be able to review and edit them, and fill out the fields already there step by step through the wizard.
Note: If Optional is displayed in front of any of the fields in each step, it will not be necessary to fill them out and your listing can be created independently of these.
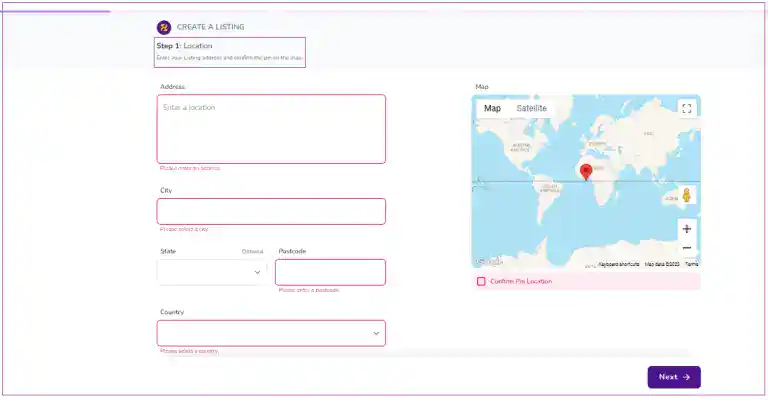
Step 1: Location
As City, County/State and Country fields are imported, you should just enter your listing’s Address and Postal Code.
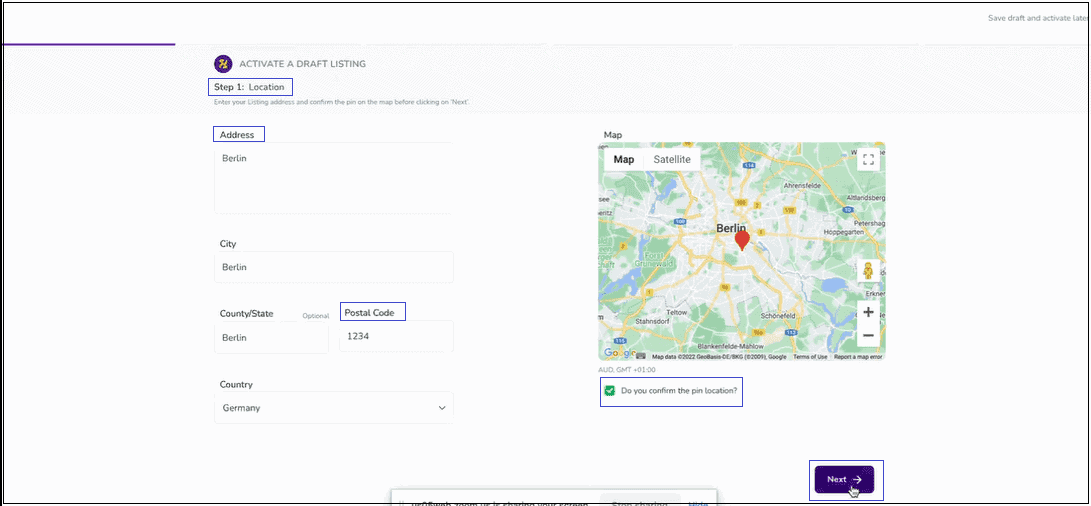
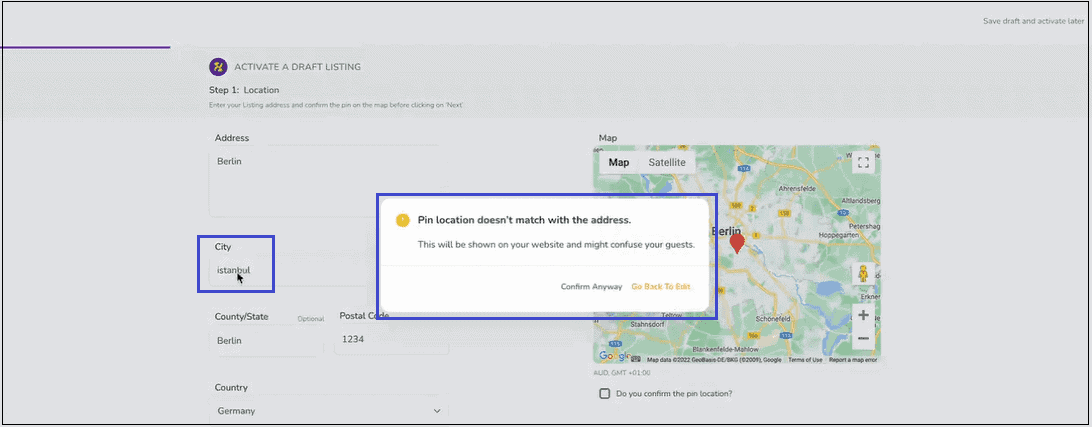
Note: If you insert wrong information, an alarm will pop up.
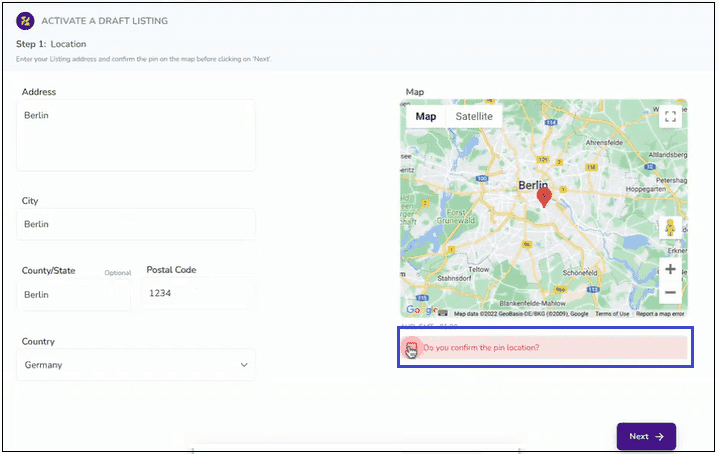
Note: If you do not tick the Do you confirm the pin location? checkbox, you will not be allowed to go to the Next step.
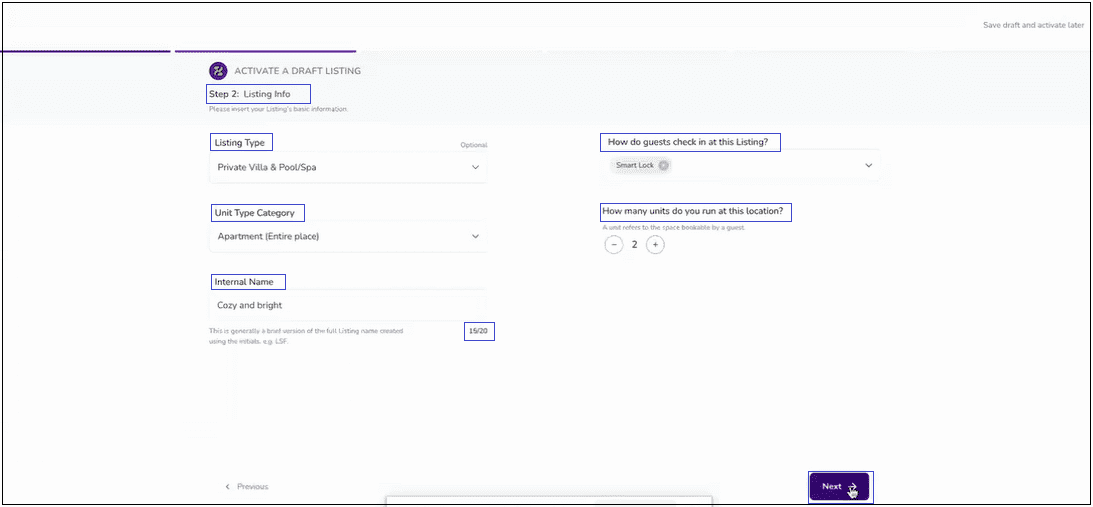
Step 2: Listing Info
As only check-in type is imported, you should insert your listing’s basic information, including Listing Type (Optional), Unit Type Category, Internal Name (with character limit ), Check-in Type (as many as you wish) and the number of units. Then, click on Next.
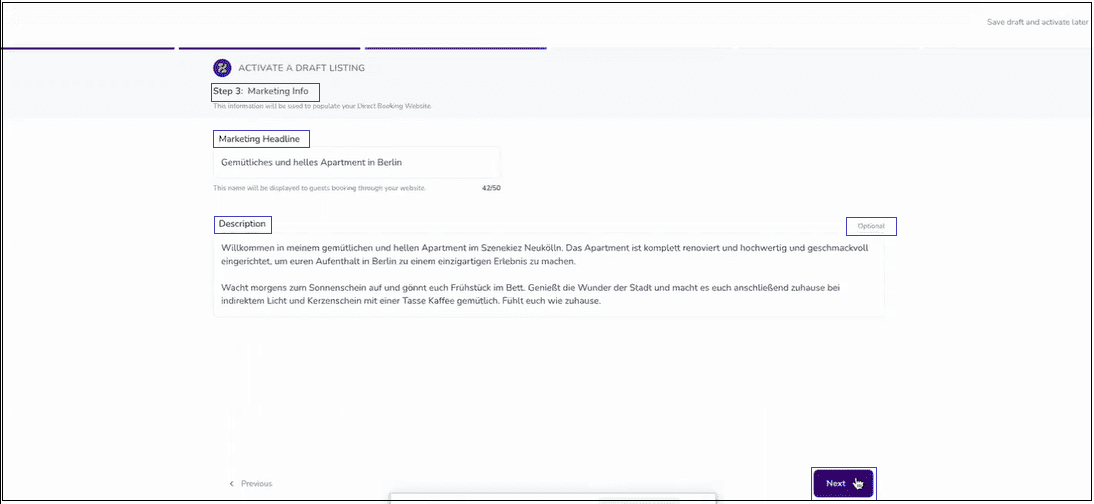
Step 3: Marketing Info
You can edit the imported Marketing Headline and its Description (Optional) or insert the new information which will be used to populate your Direct Booking Website. Then, click on Next.
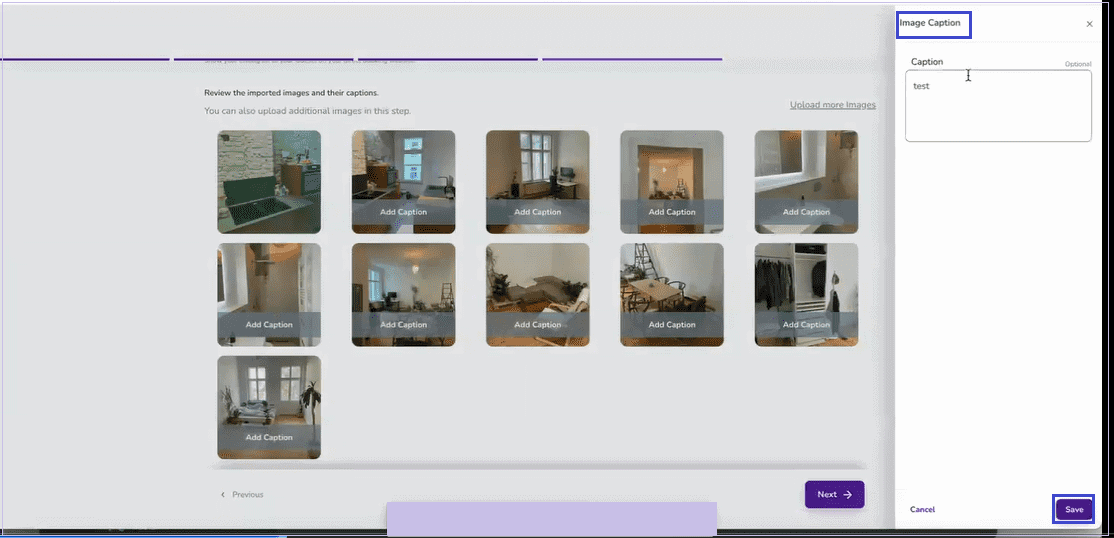
Step 4: Listing Images
You can not only review the imported images and their captions but also upload more images and captions. When done, click on Next.
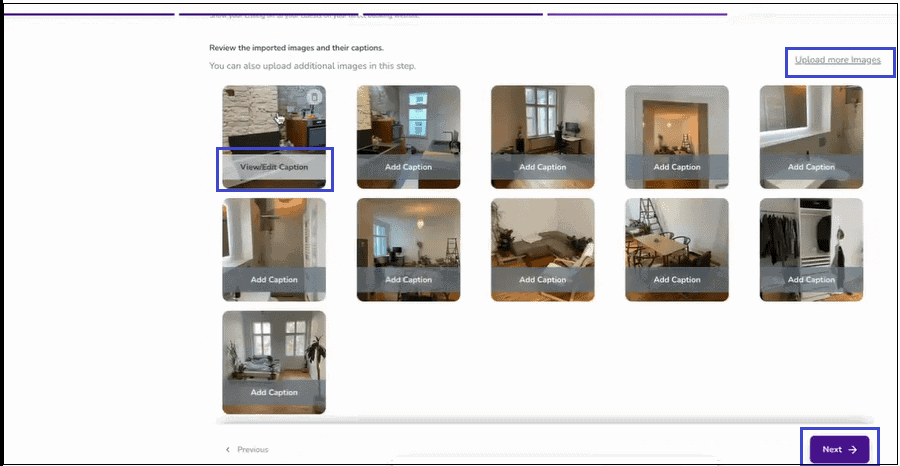
Note: If you click on View/Edit Caption, a window will appear which will allow you to edit the imported caption or add captions for images which don’t have any caption and Save.
Note: When you delete an image for any reasons, the later image will appear on its place. If you delete all the images that have been imported in the wizard, the property will be saved without image.
Step 5: Listing Amenities
Although the amenities are imported from Airbnb, you can manage them by clicking on Add or Remove Amenities on the top right. Then, click on Next.

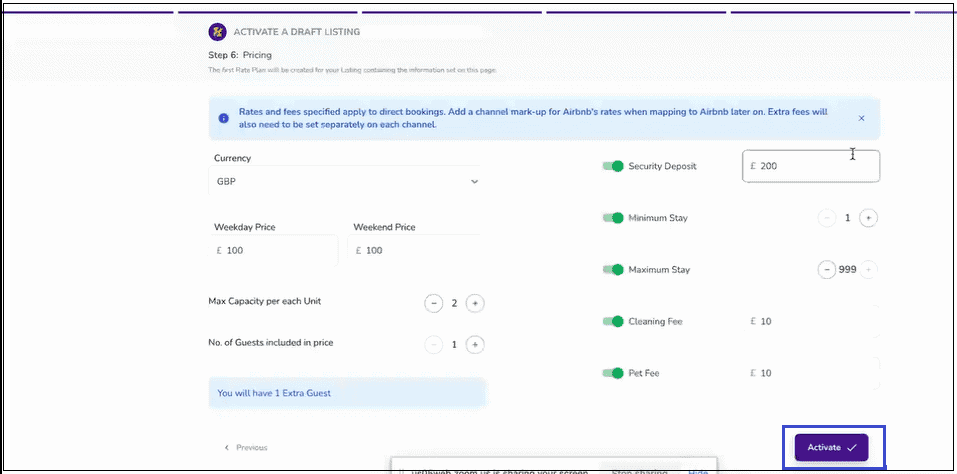
Step 6: Pricing
Note that the first Rate Plan will be created for your Listing containing the information set during this step. So, you should fill out the fields, including the Currency, Weekday Price, Weekend Price, Number of Guests included in price, and Additional fee for extra guests. You can also turn on optional toggles such as Security Deposit, Cleaning Fee, and Pet Fee. You can edit the imported Maximum Capacity. Finally, you can click on either Activate or Save draft and activate Later.
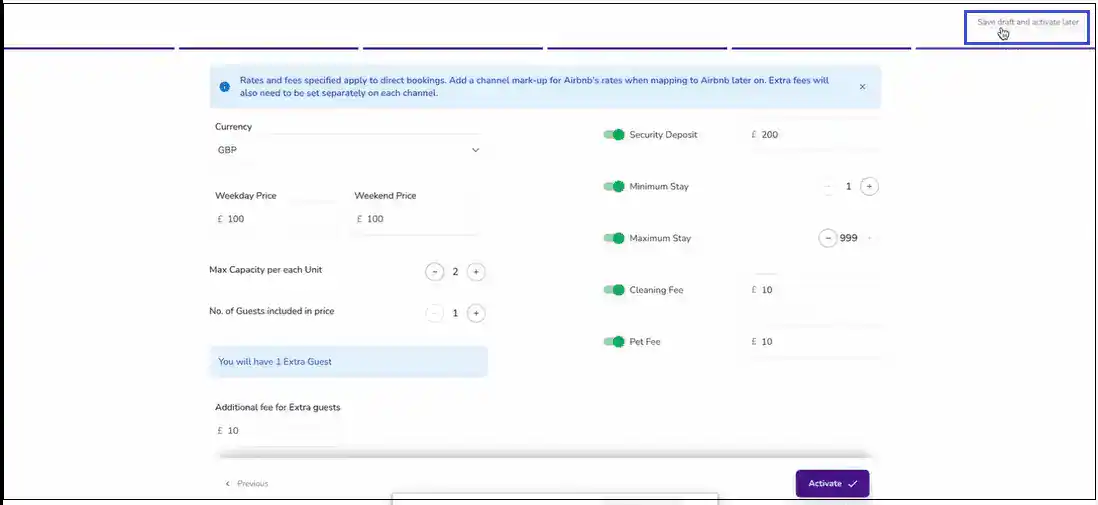
You can click on Activate to create your listing if you have sufficient licences. Then, you will be redirected to the landing page with the Listing Successfully Created message displayed on top right. The created listing will appear under the Published.
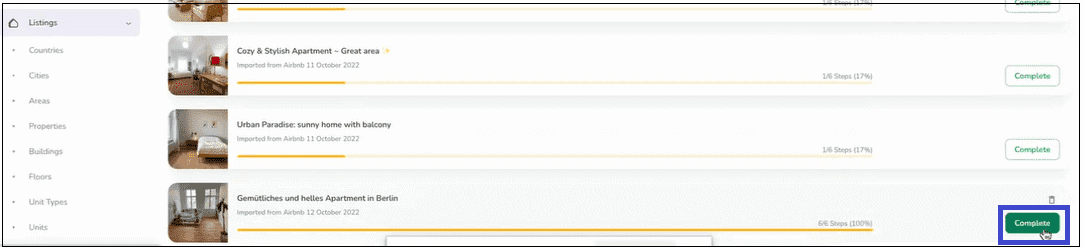
Or, you can click on Save draft and activate later and the listing will be saved and displayed under Drafts until you purchase licences.
In order to activate the listing, click on Drafts on the landing page. Select your listing and click on Complete. Then, you will be redirected to the last step you were on.
Once you have filled out the fields, you can click on Activate to create your listing.
Finally, you will see the Listing Successfully Created message.

Watch this tutorial video on how to import your listings from Airbnb directly:
Step 1: Location
Enter your Listing Address (City, Postcode, Country), Confirm Pin Location on the map and click on Next.
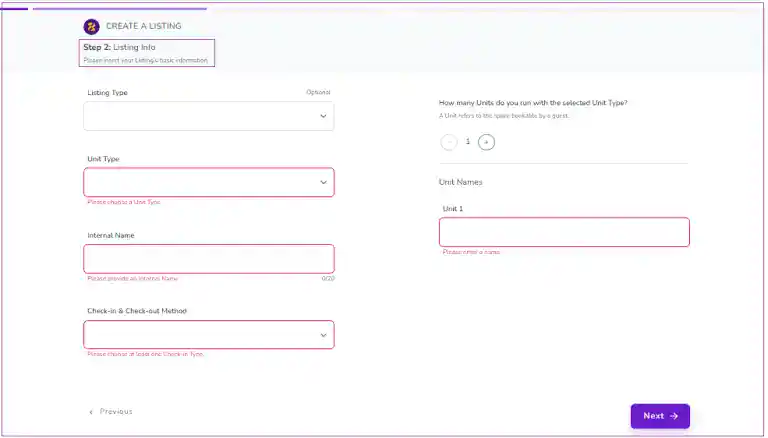
Step 2: Listing Info
Insert your basic information including Listing Type (Optional), Unit Type, Internal Name, Check-in/Check-out Method, and Unit Names and click on Next.
Step 3: Marketing Info
Insert the information including Marketing Headline and its Description (Optional) which will be shown in your Direct Booking website and click on Next.

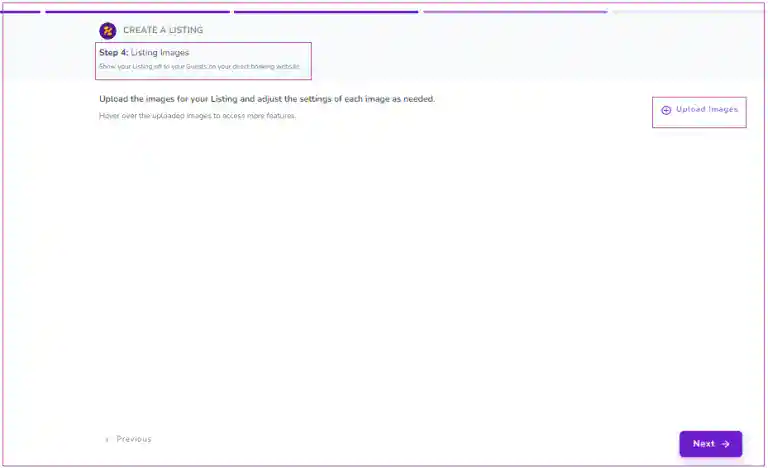
Step 4: Listing Images
Upload the images for your Listing and adjust the settings of each image as needed and click on Next.
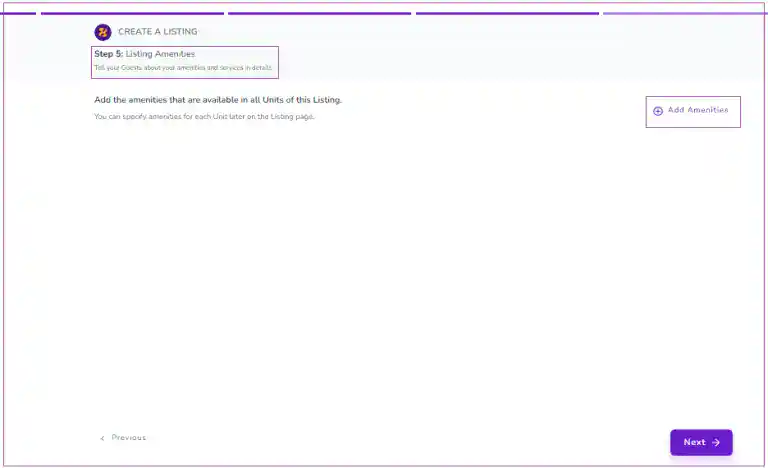
Step 5: Listing Amenities
Add the amenities that are available in all Units of this Listing. Then, click on Next.
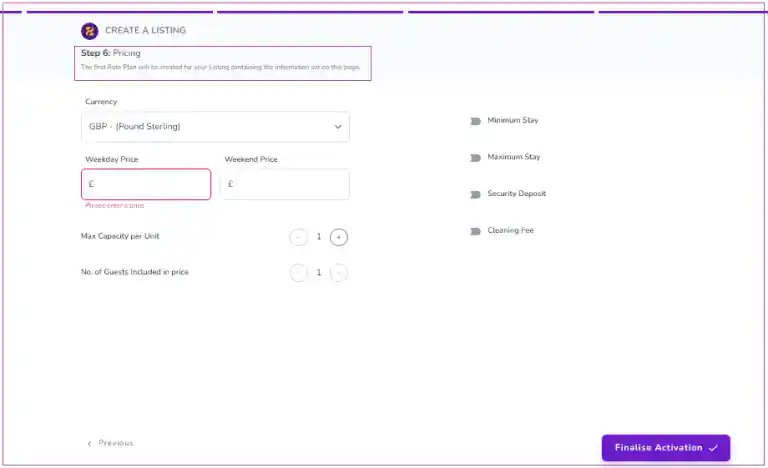
Step 6: Pricing
Fill out the fields, including the Currency, Weekday Price, Weekend Price, Maximum Capacity per Unit, and Number of Guests Included in Price. You can also turn on optional toggles such as Minimum Stay, Maximum Stay, Security Deposit, and Cleaning Fee. Finally, you can click on either Finalise Activation or Save Draft and Activate Later.
Zeevou’s customisable Booking Confirmation Process ensures that any unmet conditions are fulfilled before check-in can occur. For this, an email will be sent to guests once they place a booking, asking them to take this process and give the necessary information, documents, and payments.
- Configure Your Booking Confirmation:
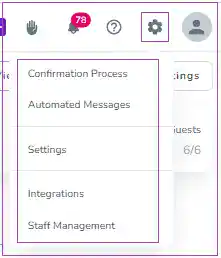
You can open app.zeevou.com. On the top right of the page, click on the gear sign, and choose Confirmation Process. you can open the Confirmation Settings, where you’ll be able to customise the fields and texts in the Confirmation Process.
Step 1-1: General Info
On this page, you can specify the following details:
- Booking General fields
- Person Booking fields
- Marketing Consent content
- Privacy Policy Note
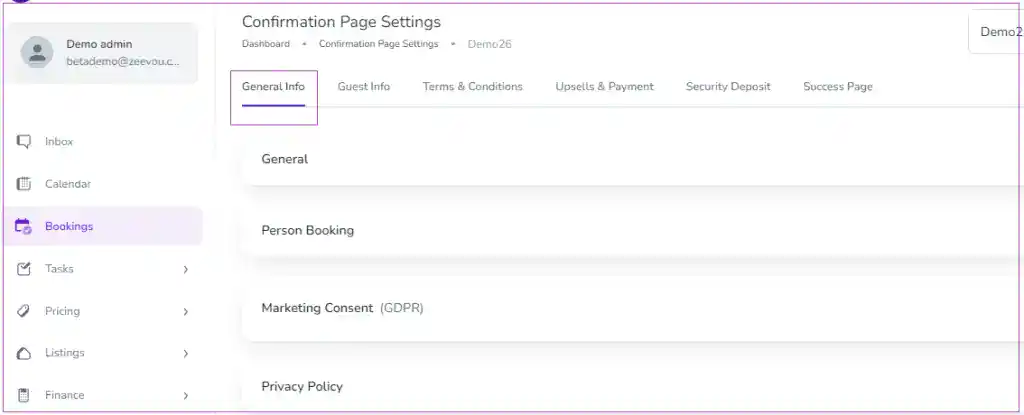
- Go to Confirmation Page Settings.
- Go to the General Info tab which contains General, Person Booking , Marketing Consent and Privacy Policy sections.
- Turn on the items which need to be shown to guests during the confirmation process.
- Determine whether the item should be mandatory or optional for guests.
- In the General Info section, you can choose Booking Purpose, Departure Time, and Arrival Time to be asked from guests.
Note: When you turn on some mandatory items by default, you can see: “Filling this field will be Mandatory for the Guest.”
- Go to Person Booking and turn on the items which need to be shown to the Person Booking during the confirmation process:
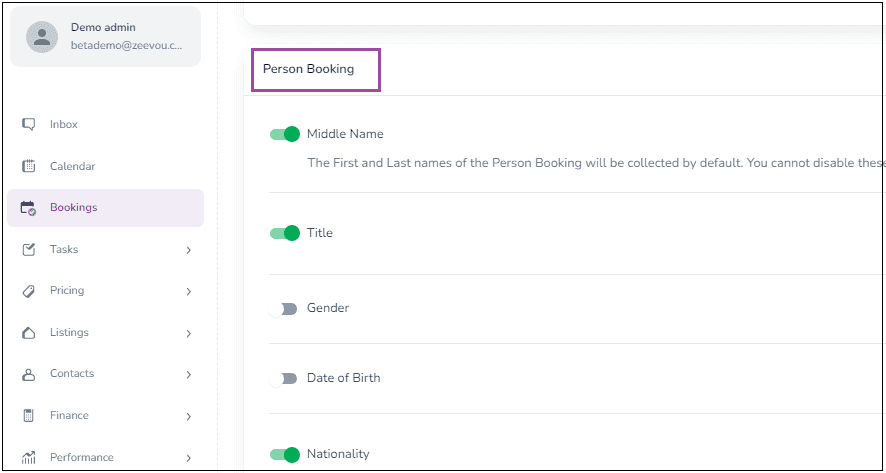
Note: You can add fields with custom descriptions to collect IDs from guests by turning on Document Upload Settings.
Note: You can click on + Ask a Custom Question to add your desired questions to be asked during the Confirmation Process.
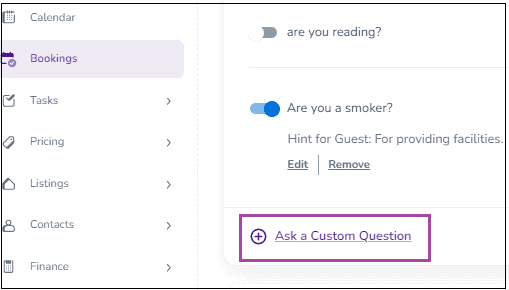
Then, a window will appear in which you can either select your question from the drop down Menu or click on + Create A New Question . Finally, click on Add.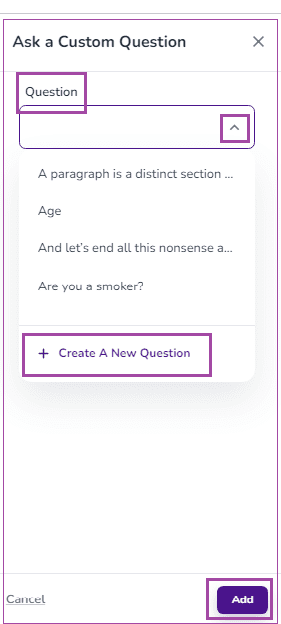
When you click on + Create A New Question, a window will appear in which you can insert the question and add a hint for guests. Finally, click on Create.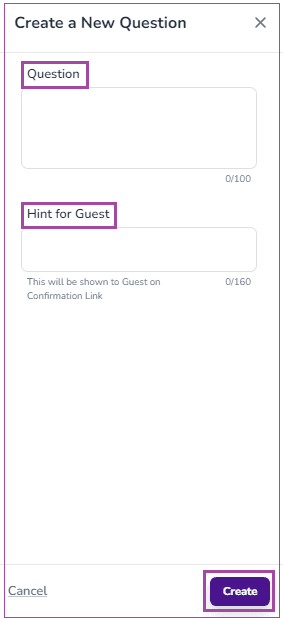
When the question is created, you can still make changes by clicking on Edit or Remove. You can also make it Optional or Mandatory to be replied.
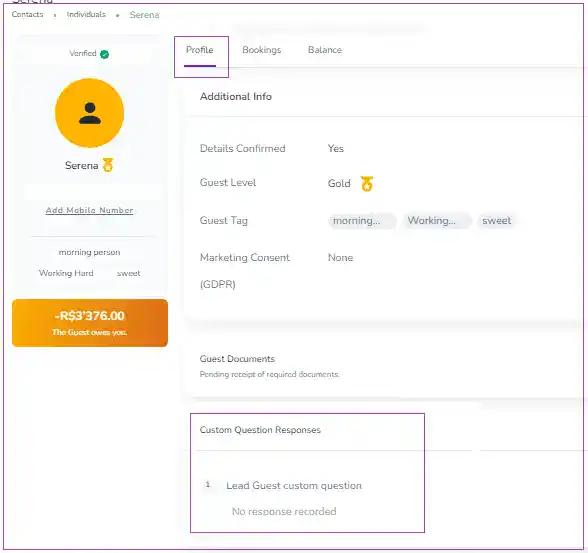
In booking view mode, you can click on Lead Guest or Person Booking Name and their profile will be shown. In their profile, you can see Custom Question Responses where the questions and guest’s replies are displayed. You can View or Edit the answers by clicking on the three dots.
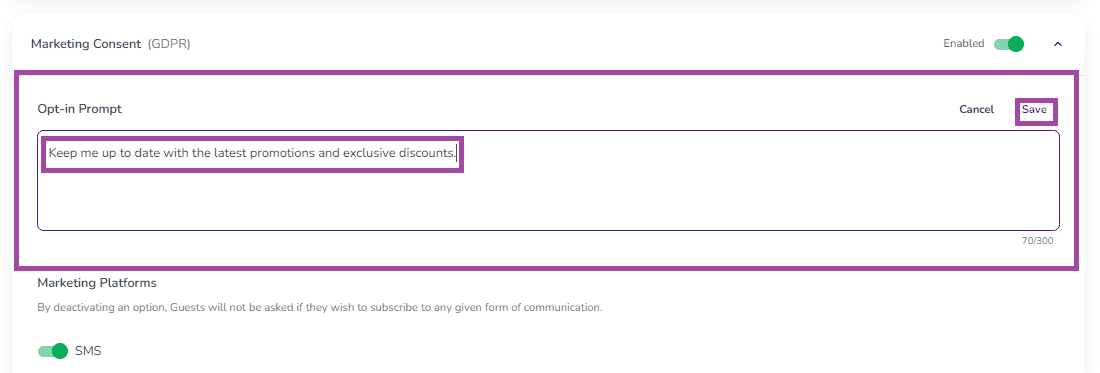
- Finally, go to the Marketing Consent section.
Note: You can update and inform your guests of the latest marketing promotions and exclusive discounts via various channels here.

- Toggle Disable to Enable to turn on Marketing Consent (GDPR) and choose from the tick the Marketing Platforms you want your guests to give you consent for marketing purposes and initiatives:
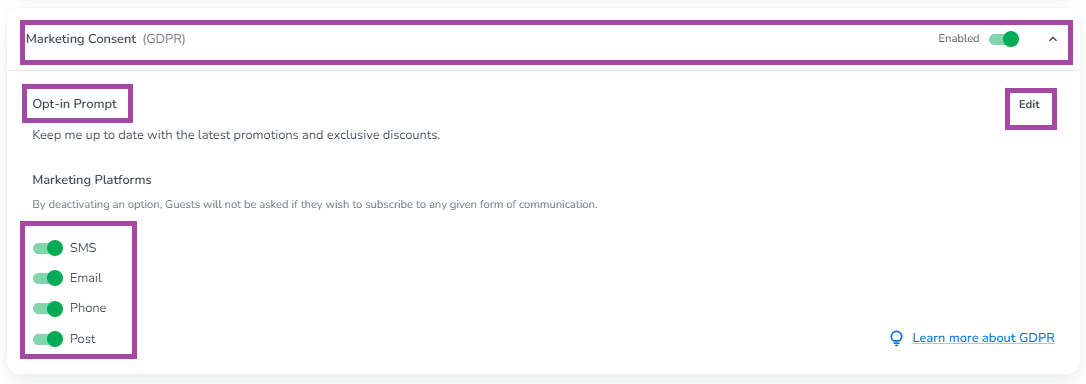
Note: You can also customise the text that will be displayed to guests.
To do so, click on Edit to make changes in the Opt-in Prompt and finally click Save.
Step 2-1: Guest Info
You can do this the same as you did for the Person Booking section. If the Lead Guest and Person Booking are one person, the system will sum up the fields related to both. Otherwise, related fields will be shown to each.
There are two more sections as Additional Guests for Adults and Children which you can enable to be shown during the confirmation process:
Note: Disabled sections will be hidden from guests on Confirmation Pages.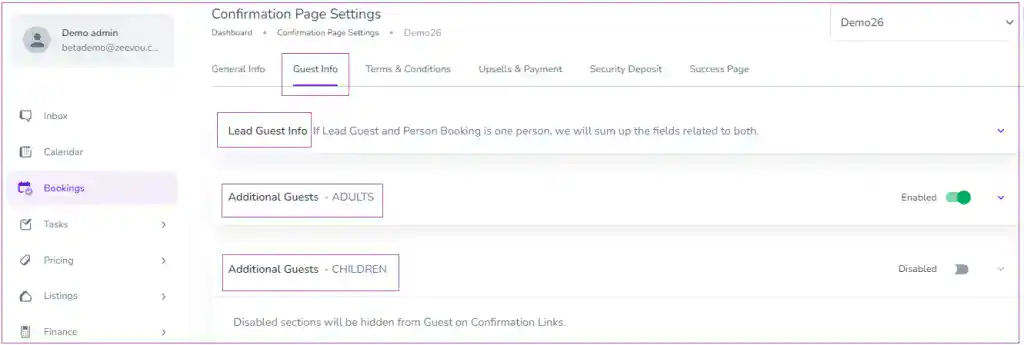
Note: You can click on Ask a Custom Question to add your desired questions to be asked during the Confirmation Process.(As explained above.)
Step 3-1: Terms and Conditions
You can enable this step to require Person Booking to sign Terms and Conditions as part of the Confirmation Process by turning on the Disabled toggle. For more information click here.
Step 4-1: Upsells & Payment
You can view three cards of Payment Method, Upsells and Payment under the Upsells & Payment tab. On the Payment Method card, you can select your preferred payment method for Bookings. You can enable the toggle on Bank Transfer and/or Card.
Note that you can select the card which your organisations have already integrated. If you enable the toggle of Upsells on the Upsells card, your guests can see each Listing’s list of Upsells which you have already created. You can Edit the Payment Note which will be shown to guests on the Payment step of the Confirmation Process.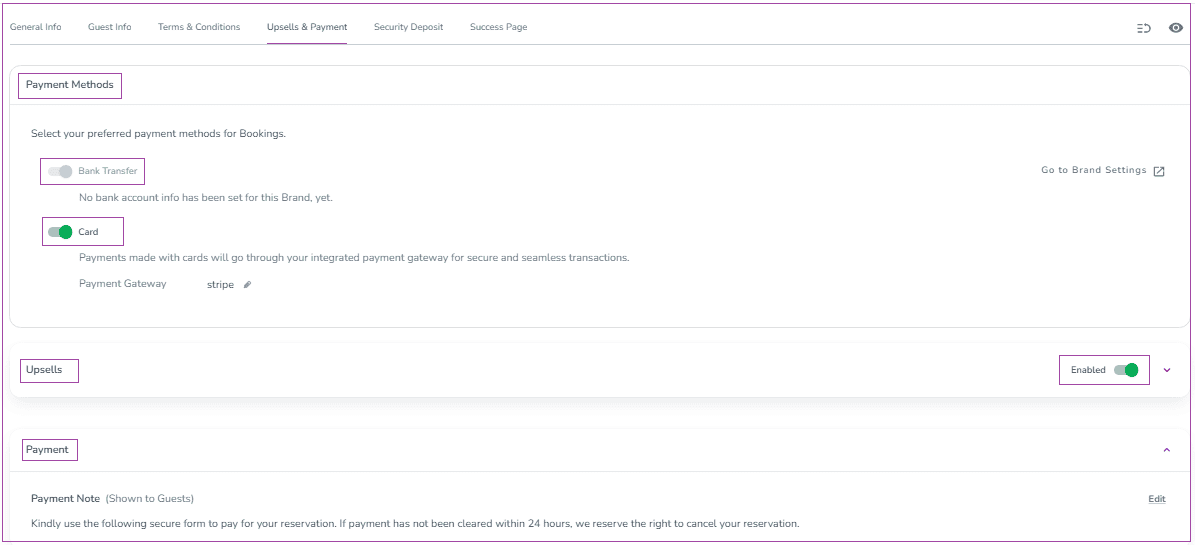
Step 5-1: Security Deposit
On the Security Deposit Methods card, you can select your preferred collection method of Bookings. If you enable the toggle of Card, payments made with cards will go through your integrated payment gateway for secure and seamless transactions.
Note that you can select the card which your organisations have already integrated.
If you enable the toggle of Airbnb, the SD collection will be applied for the bookings which are created after the date you set in the opened drawer.On the Security Deposit card, you can Edit the Security Deposit Note which will be shown to guests.
Step 6-1: Success Page
Once guests have completed all the confirmation steps, the Success Page will be displayed to them. There is a default text shown to guests as their final booking step. You can click on Edit to change its text.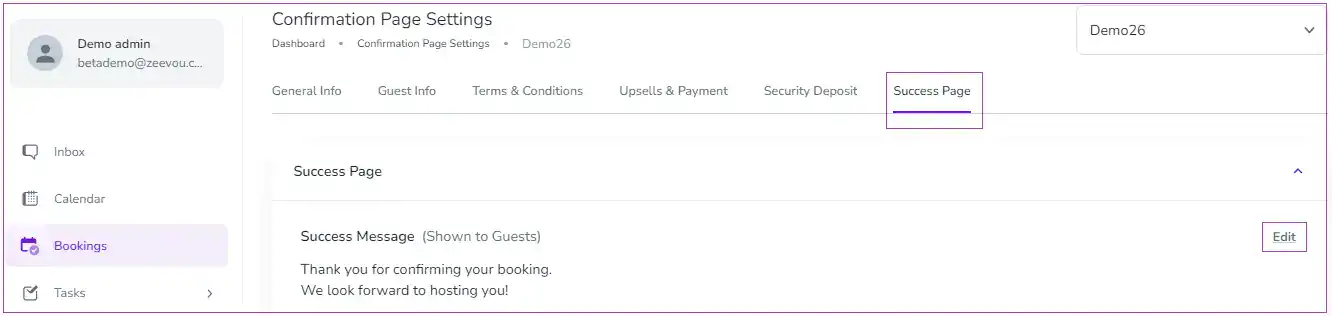
Watch this tutorial video on how to configure the Booking Confirmation steps:
- If you require your guests to sign your “Terms and Conditions” check the following guide:
Terms & Conditions Settings require the Person Booking to sign Terms & Conditions as part of the Booking Confirmation Step. To do so,
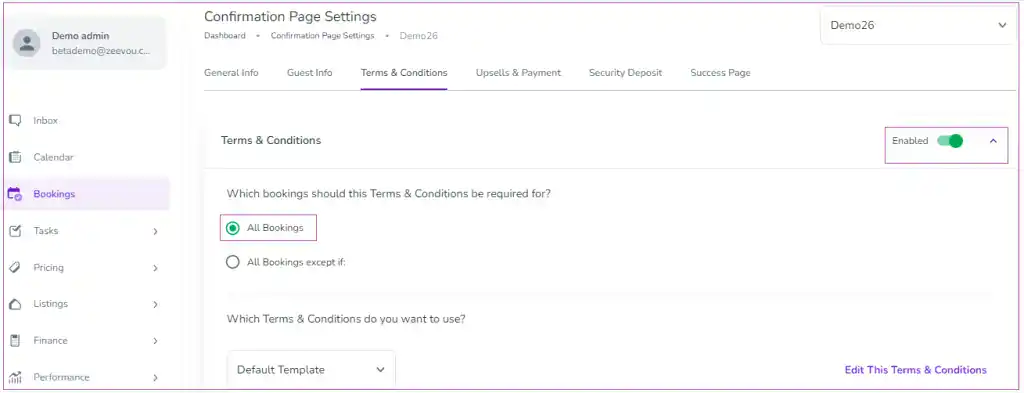
Step 1-2: Turn on the Disabled toggle switch to Enabled.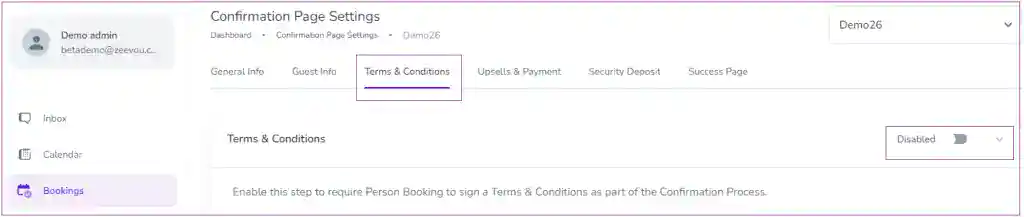
Step 2-2: When Enabled, the Terms & Conditions is required for All Bookings by default.
Step 3-2: You can exclude some bookings from the Terms & Conditions by turning on All Bookings except if. Then, you may tick the box next to The Booking Channel is to exclude the bookings coming from specific channel(s) you select from the drop-down and/or tick the box next to The Lead Guest has signed the same Terms & Conditions before.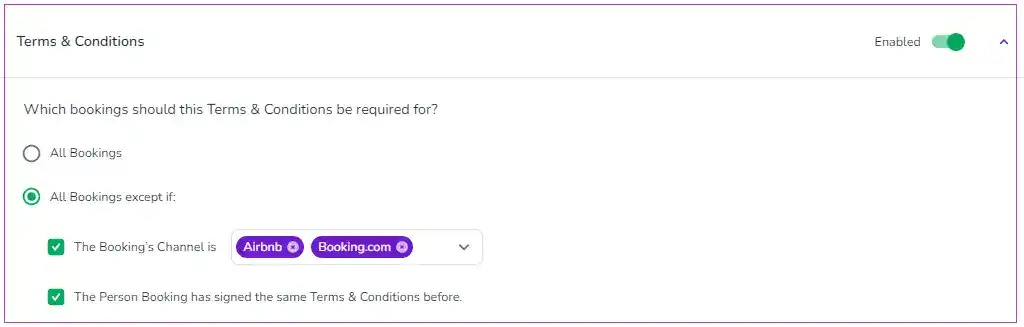
Step 4-2: A default Terms & Conditions template is set. Please review it to make sure it includes all you need to be covered and signed.
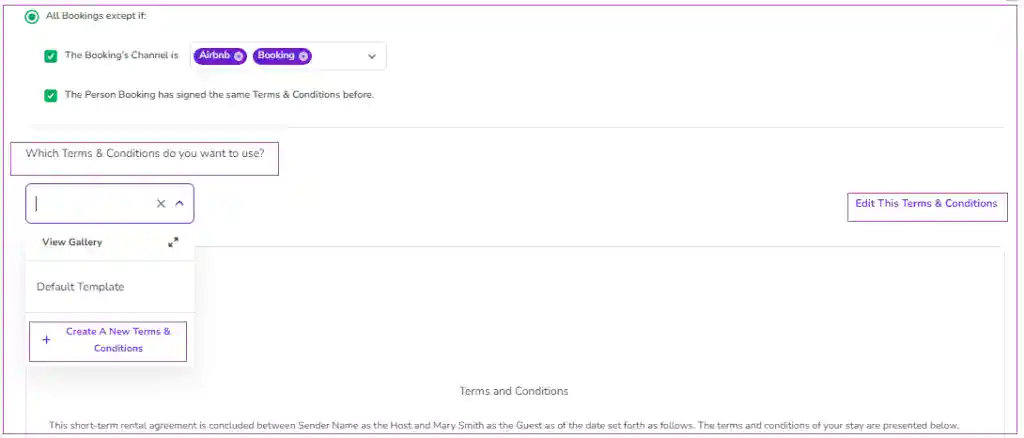
You can also click on the arrows in front of View Gallery to view Active or Archived Templates. For each template, you can click on three dots to Edit or Remove.
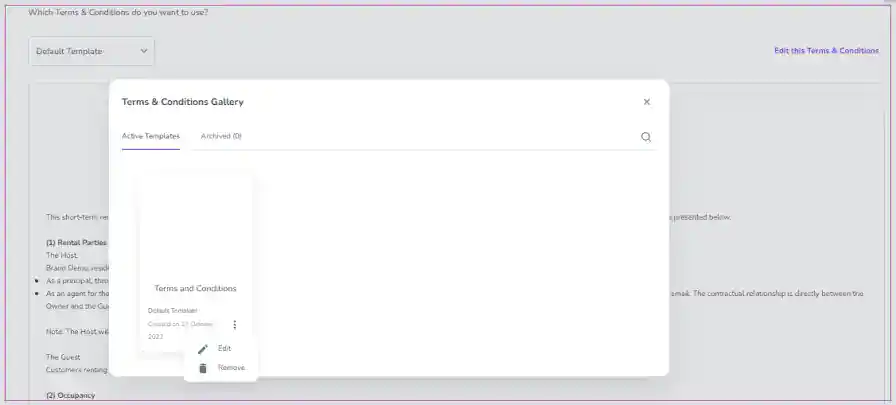
Note that when the templated is used, it can be removed and archived. It will be deleted if it is not used.

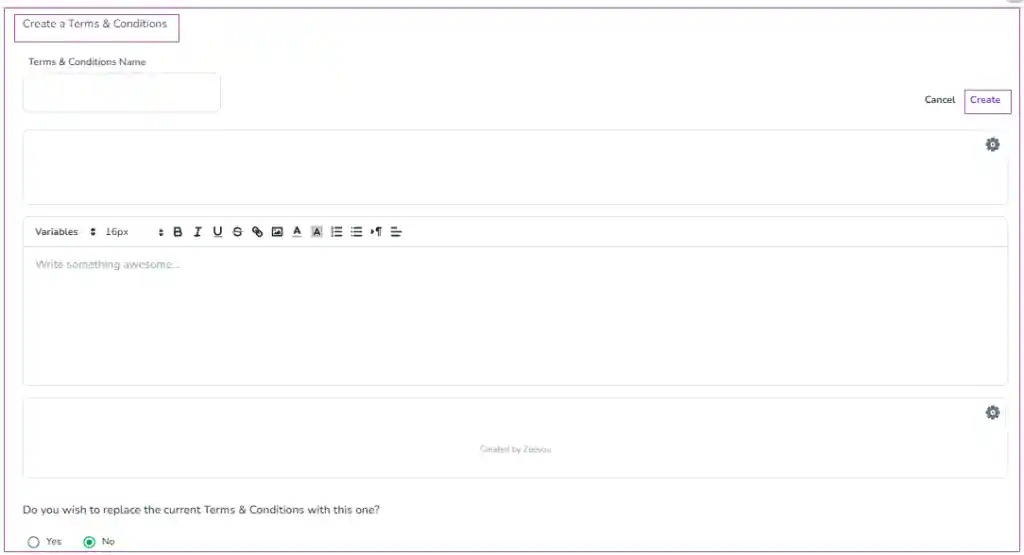
You may prefer to edit the default Terms & Conditions template or create your own text by clicking on + Create A New Terms & Conditions and insert the title and text of the Terms & Conditions.
Note: If you want to make changes to the signed Terms & Conditions, you may click on Revise This Terms & Conditions.
If the Terms & Conditions has not been signed yet, you can edit it by clicking on Edit This Terms & Conditions on the right side of the screen.
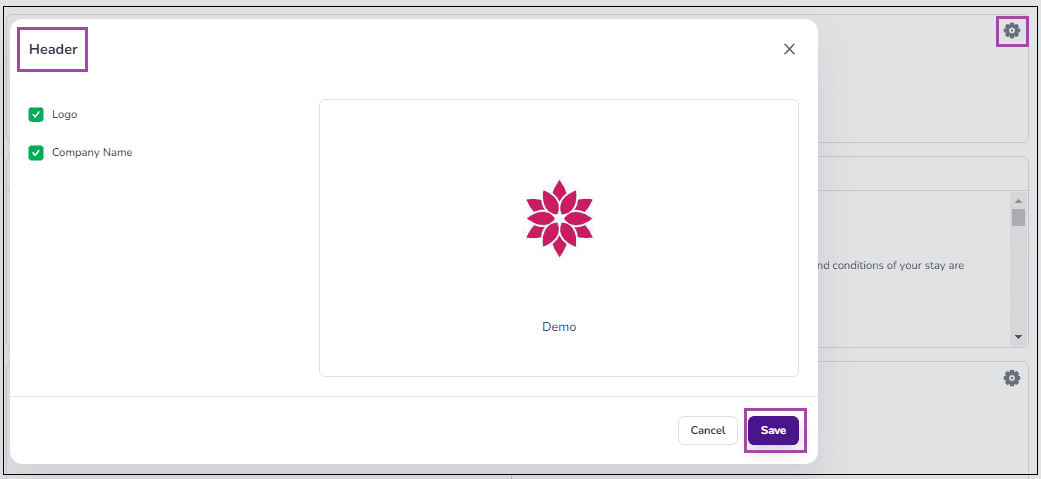
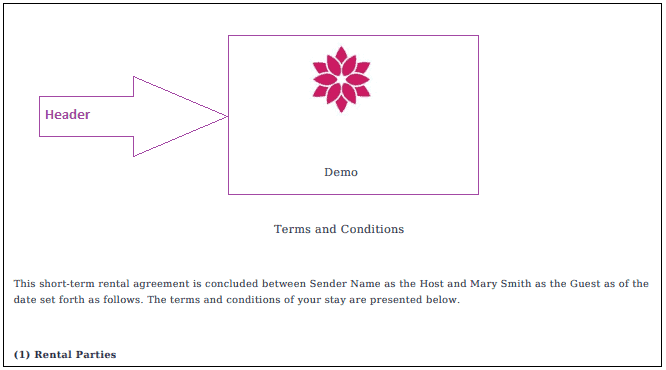
Note: Header and Footer You can add Header and/or Footer to your Terms & Conditions when you want to Edit or Revise it. If you click on the gear on the top right, a window pops up in which you can select the Logo and/or the Company Name for the Header. Finally, click Save.
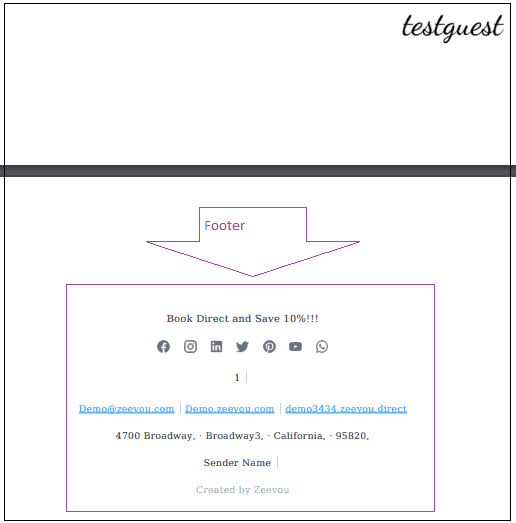
If you click on the gear on the bottom right, a window pops up in which you can select the Address, Social Media, and/or Info for the Footer. Finally, click Save.
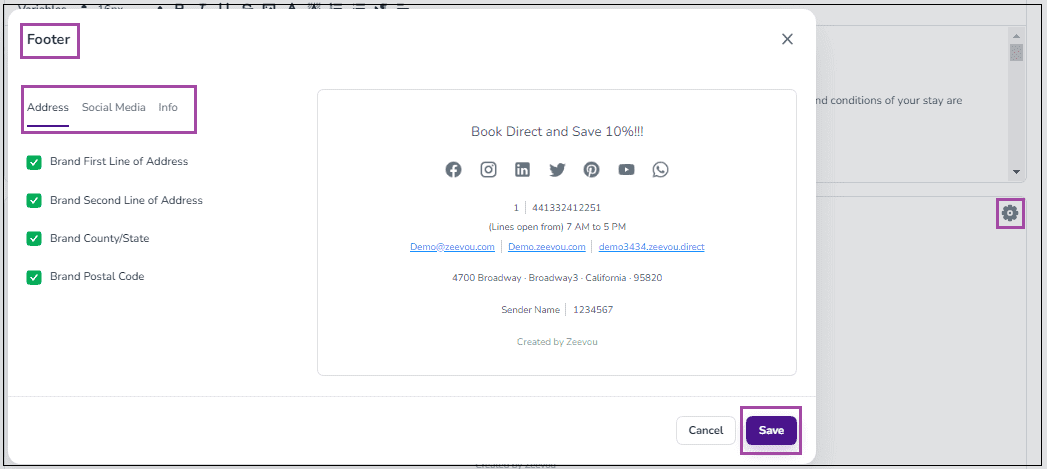
The users can see the Header and Footer in the PDF file of the Terms & Conditions when they click on here during the Confirmation Process.
Terms & Conditions View in Booking (Host View)
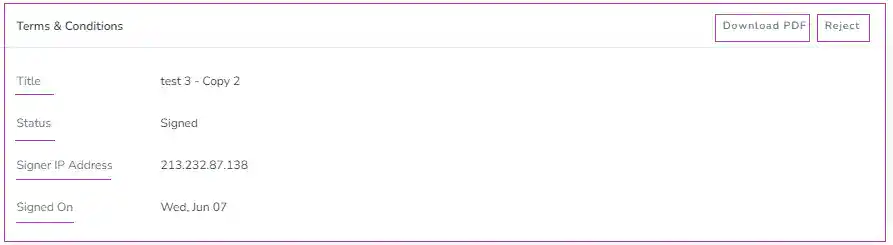
As soon as the Terms & Conditions is set on the Confirmation Page Settings, it will be placed on bookings which are created afterwards, and you can find it under the Terms & Conditions card in the booking of your choice in App.Zeevou.com. The Terms & Conditions’ toggle will be on as a default if it is set in Confirmation Process. By disabling this option, the Guest won’t be required to sign Terms & Conditions prior to checking in. If you turn on the toggle, your current set Terms & Condition text will be set for the booking.

Note: If you hover on Terms & Conditions, View Terms & Conditions will appear and by clicking on that, you will be directed to the page of the Confirmation Process, Terms & Conditions Step.
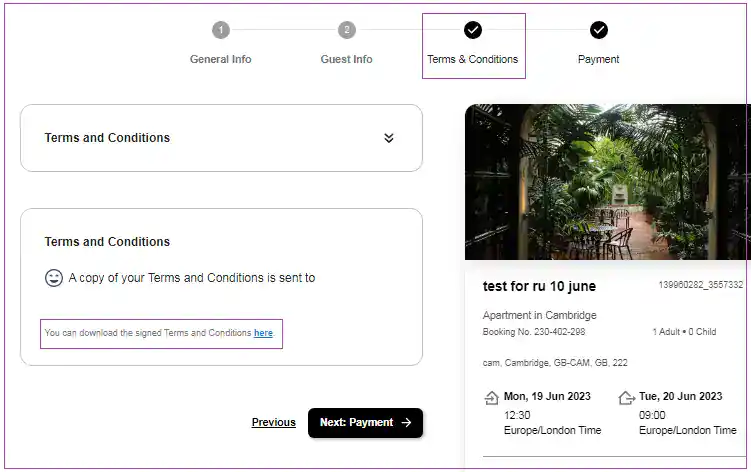
When the Terms & Conditions is signed by users, the Terms & Conditions Status will change to Signed in the corresponding booking under Details tab and there will be the Terms & Conditions PDF File to be downloaded. If you Reject this Terms & Conditions , the Terms & Conditions link will be available to be signed.
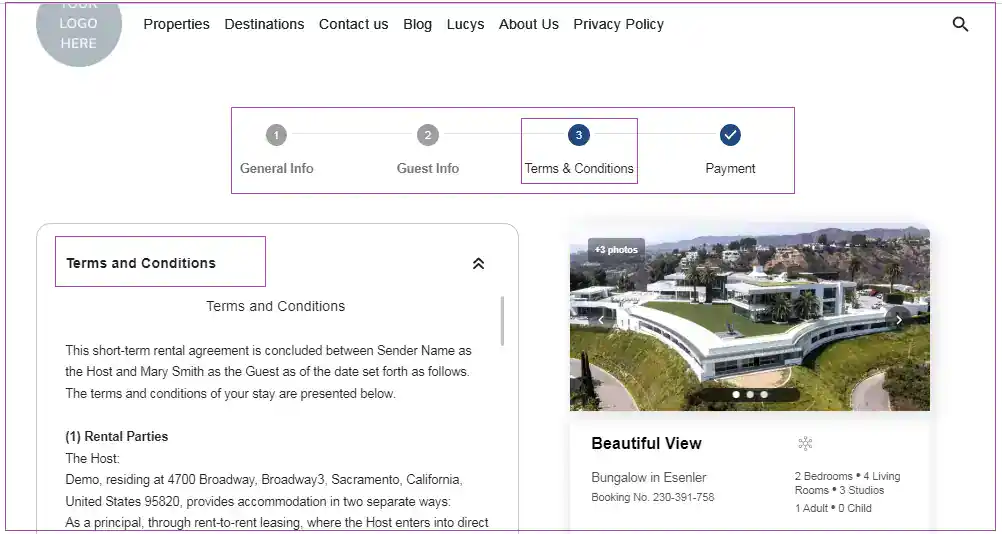
Terms & Conditions View in Confirmation Process (Guest View)
In the Confirmation Process, users can see the Terms & Conditions Step and sign the Terms & Conditions. When Terms & Conditions is signed, a copy of the Terms & Conditions will be automatically sent to the Person Booking’s email.
If no email is provided for the Person Booking or their provided email address has not been verified through previous steps, they first need to set and verify their email address to continue signing the Terms & Conditions.
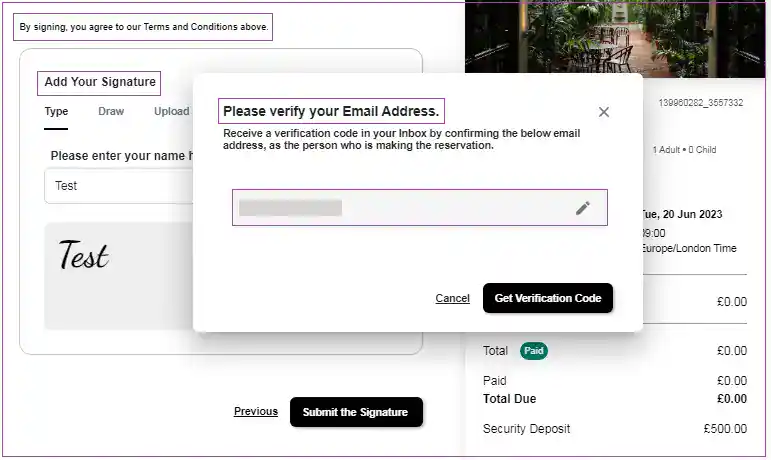
The Person Booking can also download the signed Terms & Conditions from the Terms & Conditions step page by clicking on here.
- If you require your guests to upload documents like ID, passport etc. check the following guide
You can add fields with custom descriptions to collect IDs from guests. To do so:
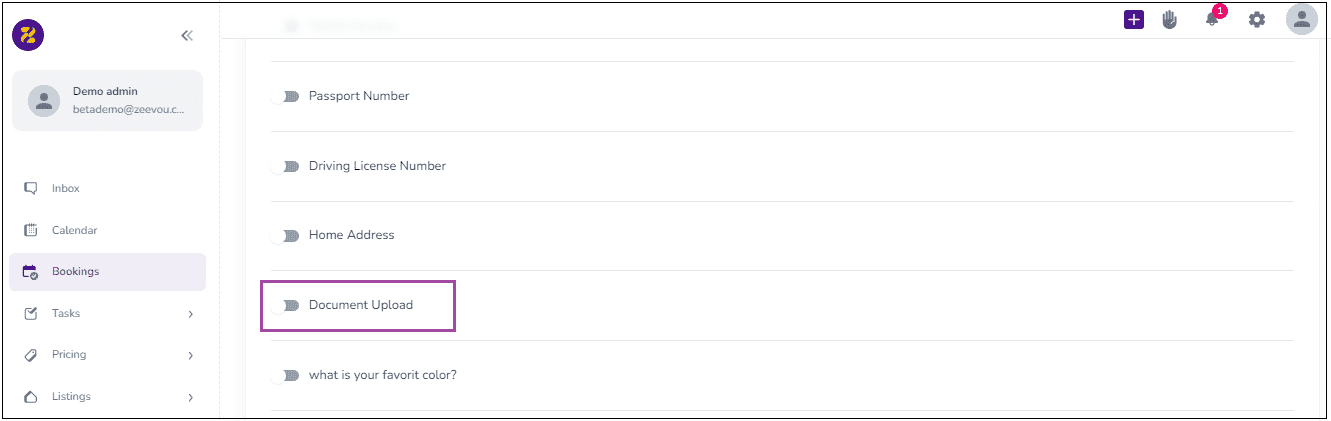
Step 1-3: Go to General Info -> Person Booking and turn on Document Upload.
Note: You can also go to Guest Info to turn it on for Lead Guest or Additional Guests (Adults/Children).
Step 2-3: When you click on Add Item, a window opens in which you can insert the ID Item, its Instruction, and its Attachment Method and finally click on Add.
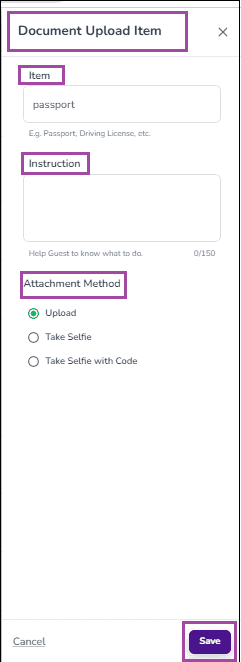
Step 3-3: The result will then be displayed, and it can be edited or deleted by clicking on the pen or bin icon.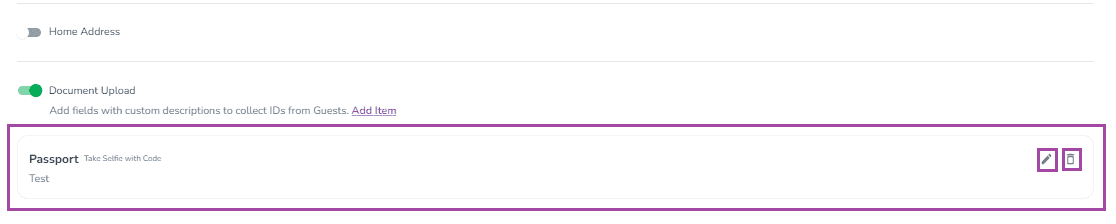
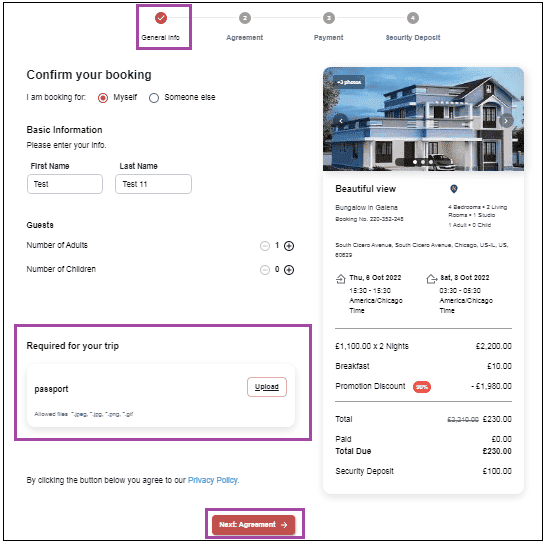
Document Upload View in Confirmation Process (Guest View)
As soon as the Document Upload is set on the confirmation page settings, it will be placed as part of the booking confirmation process. So, the guests must upload the required document(s) to continue and click on Next: Agreement.
Document Upload (Host View)
If you click on the Lead Guest’s name on Booking’s Overview, you will be redirected to the guest page to see the document(s).You can also click on Review& Verify or GO to Guest Profile to view the document details.
Note: You can access the information you collected upon booking confirmation steps in Booking > Contact > Guests
Step 1: Log into app.zeevou.com and click on gear sign and select Integrations.
Step 2: Go to Settings > Confirmation Page Settings > Upsells & Payment tab > Payment Methods card and enable the toggle the Card and select the Payment Gateway you have already integrated.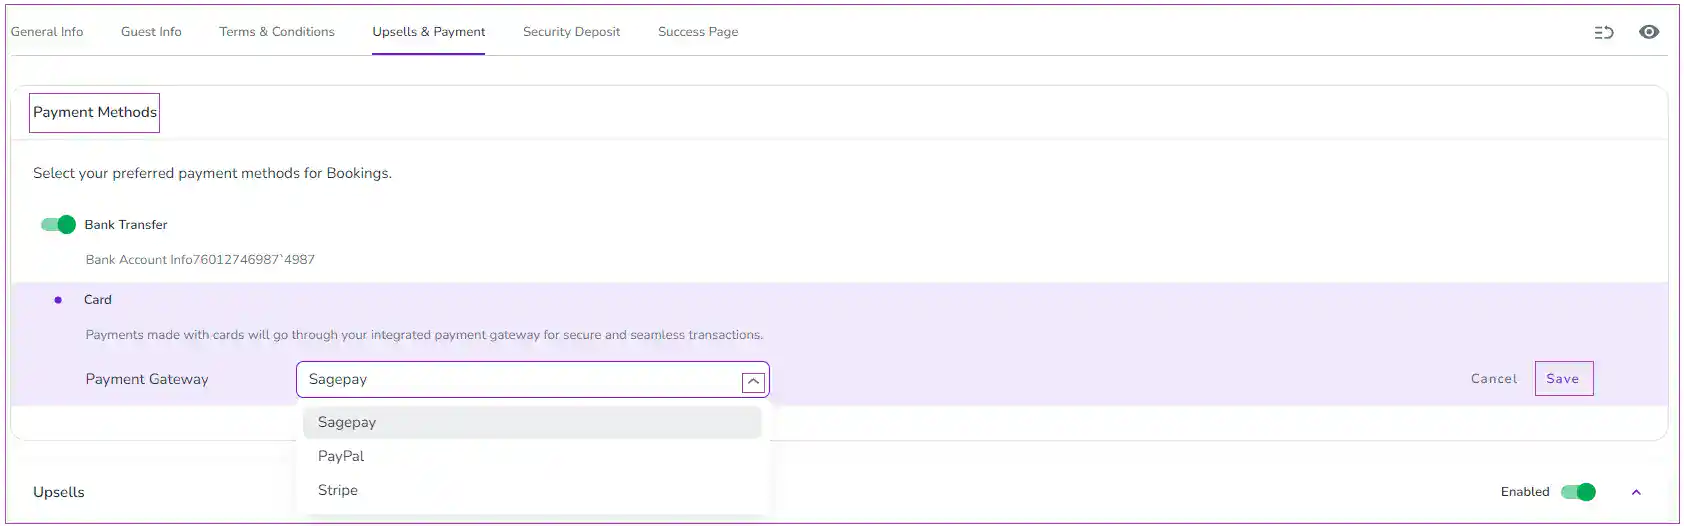
Step 3: Edit the relevant SagePay (Opayo) or Worldpay Online integration that you have decided to work with (if you are only using Worldpay as the merchant account, select SagePay).
Step 4: Sign up with Opayo for their payment gateway and provide them with the merchant numbers once you get them from your selected merchant service provider.
You need to ask them to:
- Set the account to live immediately, there’s no need for the testing environment (we have already completed the testing, we don’t need to test each account separately. If their support team tell you this is not possible, email [email protected] and let him know that you are a Zeevou customer – he’ll sort it for you).
- Activate tokens on your account (to enable the pre-authorisations to work)
- Activate the “Defer” option on your account.
- Activate the “Release” option on your account.
- Log in to your Sagepay account. Make sure to activate a 3D rule in Sagepay according to these steps. It may take a few days before you can see this option in your Sagepay account.
Getting your API credentials
Your Integration Key and Password have already been sent to you in an email. If you cannot find them, you can get them by following the guide below:
Step 1: Go to MySagePay in either the LIVE environment and log in using the Administration log in details that were provided to you during the setup of the account.
Step 2: Once you are logged in as the Administrator, in the Password details section of the Administrator tab you will see an option to ‘Create API credentials’.
Step 3: To create your credentials you just have to select the tick-box labelled “I understand that this will create new credentials and may break any existing Sage Pay API implementations.” and click on the ‘Create API credentials’ button.
Step 4: Once you have opted to create your new credentials we will present you with the following information:
Environment: This specifies the environment for which the credentials apply (test or live)
Vendor Name: The vendor name for the account
Integration Key: The value for the Integration key (username)
Integration Password: The value for the Integration password
Step 5: Then in Zeevou app, go to Integrations > Payments and click on Opayo.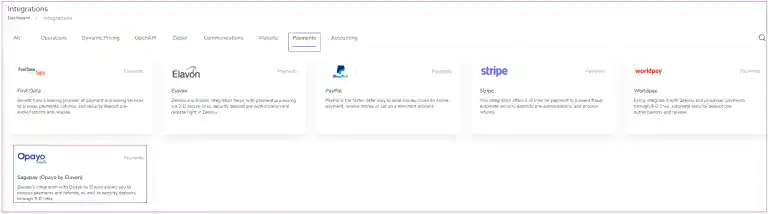
A window just like the one below opens. Click on Connect to Sagepay (Opayo by Evalon).
Step 6: Then a drawer opens in which you need to fill out four items to get connected: Integration Key, Integration Password, Sagepay Vendor Name and URL. Under URL Value enter https://pi-live.sagepay.com/api/v1.
Step 7: Click on Connect.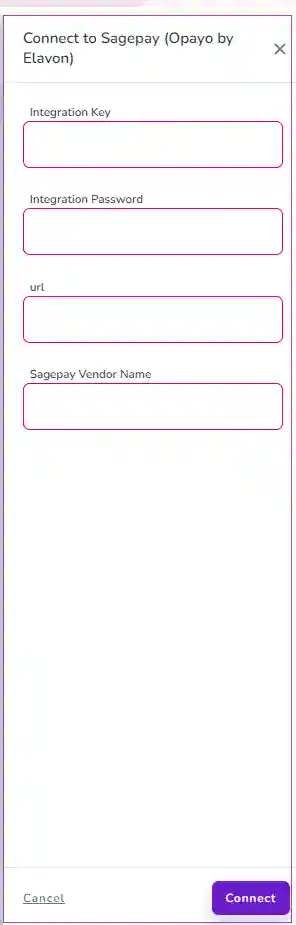
Note: The default admin user that you’re given for Opayo will not allow you to view transactions. If you want to be able to check on fraud warnings in more detail than what we are passed back by Opayo and are able to display on Zeevou, you need to create a secondary user in Opayo and grant them permission to view the transactions.
Step 1:
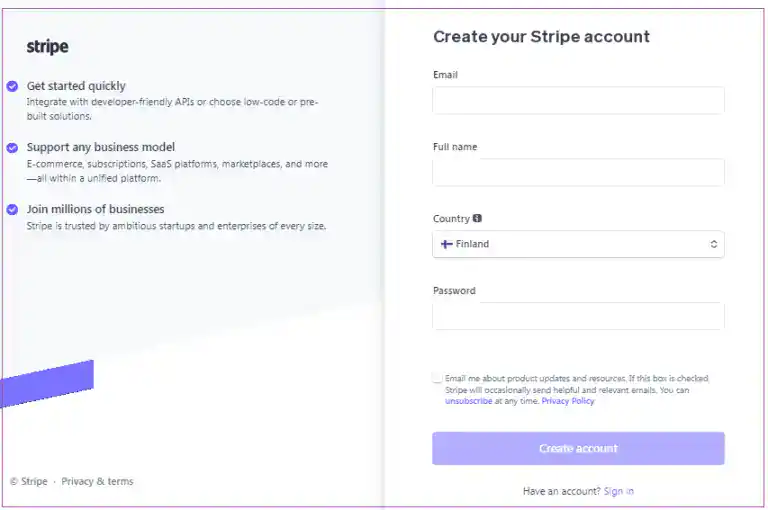
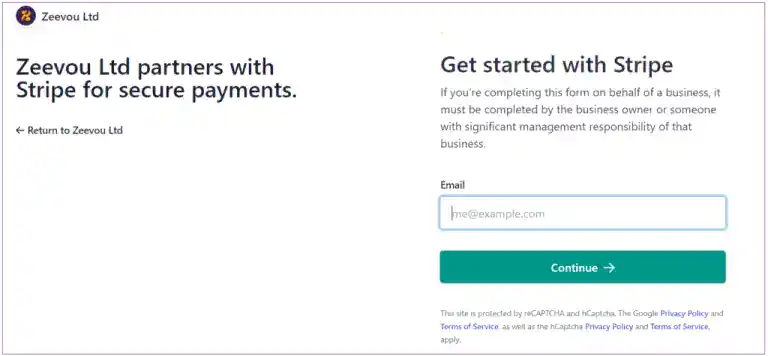
a) Register with Stripe by following this link.
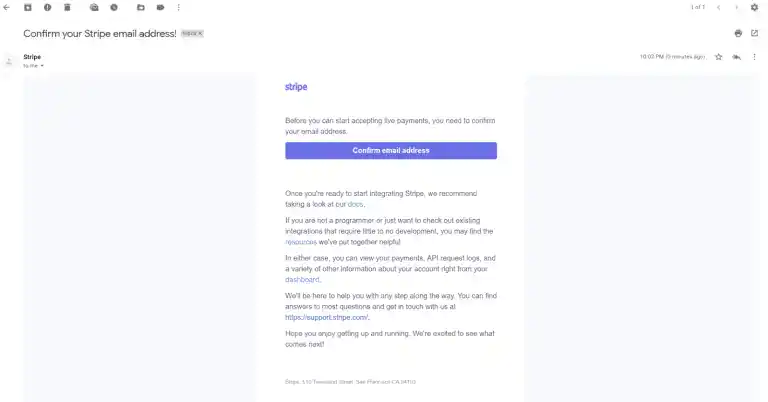
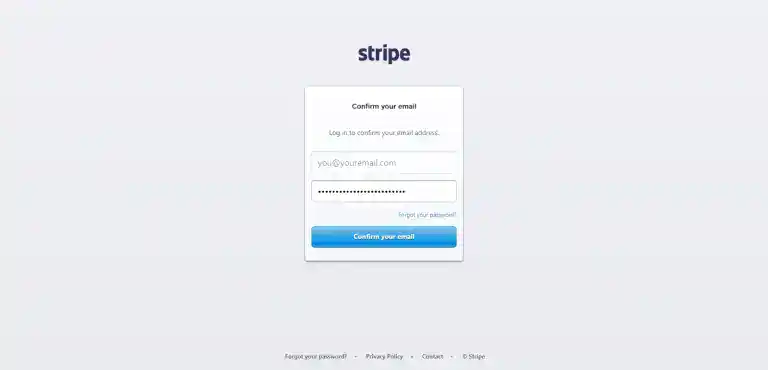
b) Great! You can skip the first question by clicking “Skip to dashboard” and you now have to confirm your Stripe email to confirm your account.
c) To activate your Stripe account, log in your Stripe account and click the Activate your account link in the left menu.
d) Complete all the fields according to the instructions and set Your website to your Zeevou subdomain address when asked.
Note: It’s OK to activate your account as an individual, you don’t need a company ID. Stripe may review your account later but you are able to activate it immediately. The activation form varies based on your country, so select that first!
e) Once completed, click “Activate account”.
Step 2: Log into app.zeevou.com and click on gear sign and select Integrations.
Step 3: On Integrations dashboard, under Payments tab, select Stripe. Click on Connect to Stripe.

Step 4: Follow the instructions till you are Connected.
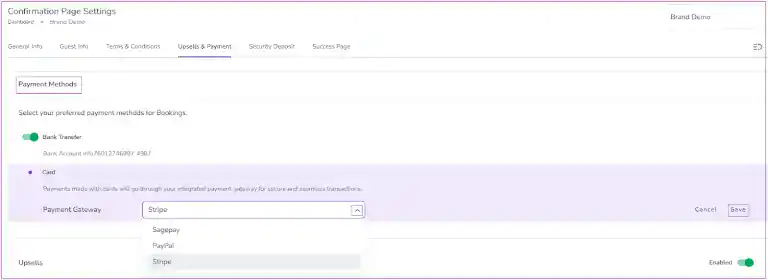
Step 5: Go to Settings > Confirmation Page Settings > Upsells & Payment tab > Payment Methods card and enable the toggle the Card and select the Payment Gateway you have already integrated. Finally, click on Save.
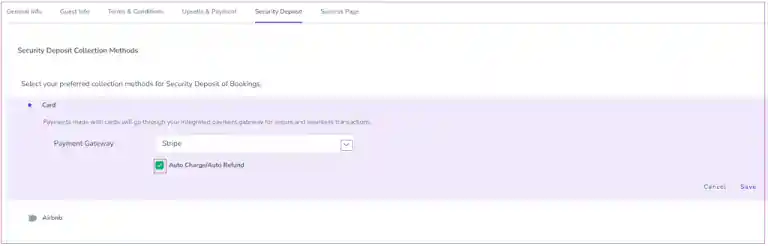
Step 6: Go to Settings > Confirmation Page Settings > Security Deposit tab > Security Deposit Collection Methods card and enable the toggle the Card and select the Payment Gateway you have already integrated. You should tick the box of Auto Charge/Auto Refund. Finally, click on Save.
Please note that Stripe does not allow for security deposits to be pre-authorised for more than 7 days from the point of pre-authorisation. To help overcome this, we have developed two options:
1. The security deposit extend module that automatically authorises the deposit again and this goes on according to security deposit timeline settings
2. To auto-capture and auto-refund funds to be held as a security deposit. This will allow you to keep a security deposit for bookings of any length.
That’s it! You have now connected your Stripe account and are ready to receive payments directly from guests!
Step 1: Log into app.zeevou.com and click on gear sign and select Integrations.
Step 2: Go to Settings > Confirmation Page Settings > Upsells & Payment tab > Payment Methods card and enable the toggle the Card and select the Payment Gateway you have already integrated.
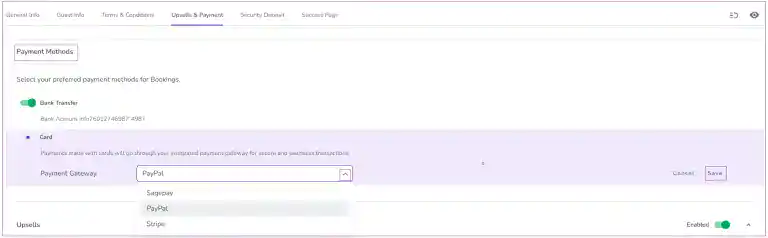
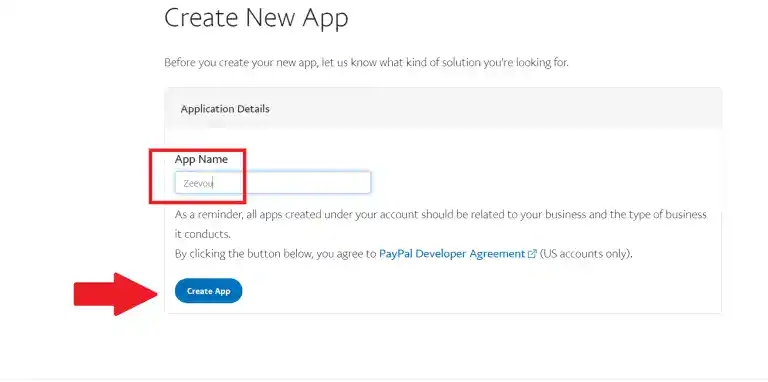
Step 3: Register with PayPal by following this link and complete your sign-up process to have a live account.
Step 4: Log in to your PayPal account.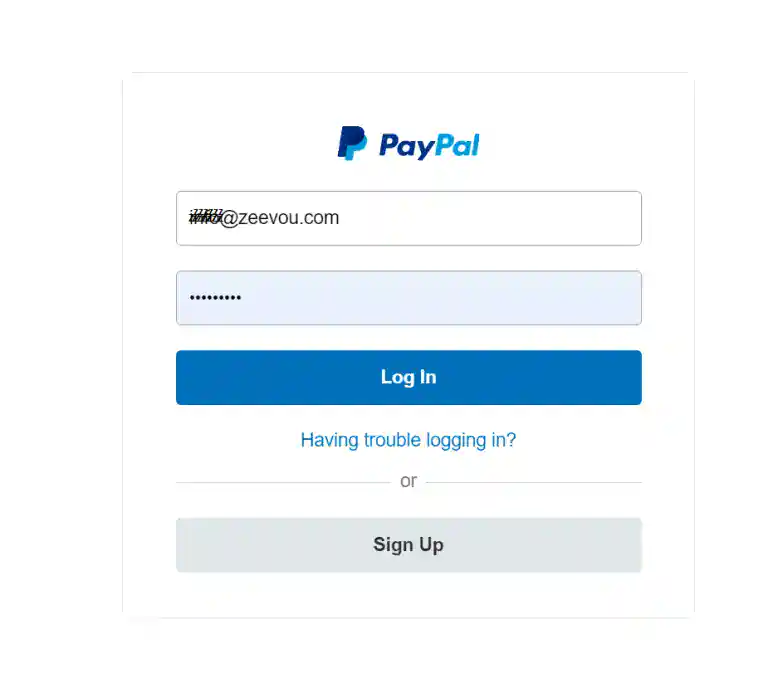
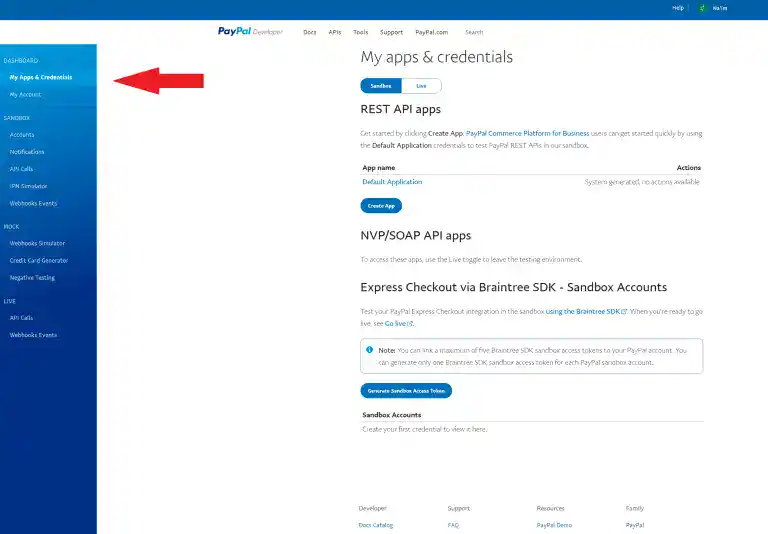
Step 5: Click on my Apps and Credentials on the dashboard.
Step 6: Click on the Live tab on top. Then, click on the Create App button.
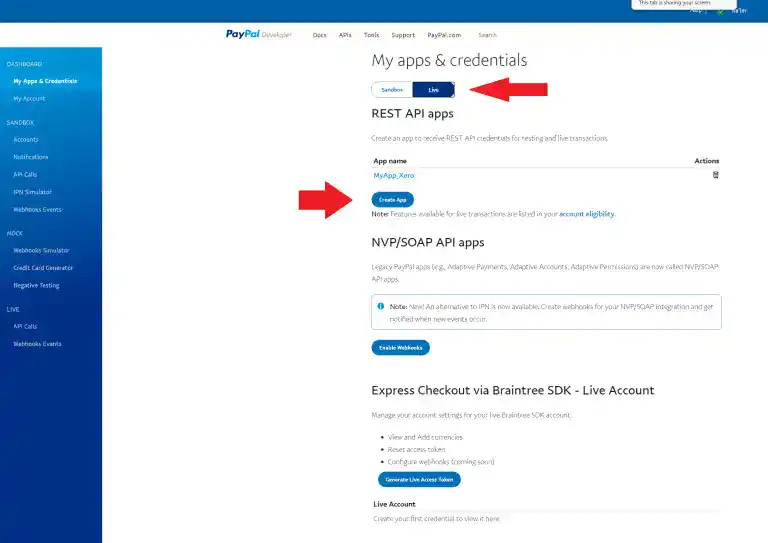
Step 7: Type Zeevou in the box and click on Create App button.
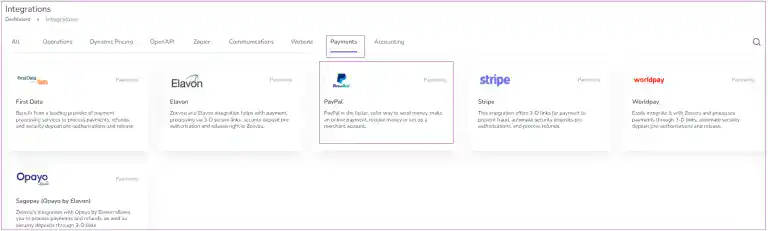
Step 8: Then in Zeevou , go to Integrations -> Payments and click on PayPal.
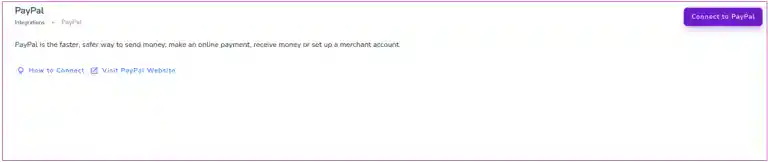
A window just like the one below opens. Click on Connect to PayPal.
Step 9: Then a drawer opens in which you need to fill out three parts to get connected:
Copy the value from the Client ID row, and paste it in the Zeevou in front of the Client ID row. Then, click on the Show button under Secret, and copy the value from the row and paste it in front of Client Secret in Zeevou. For Environment, Type Live. Finally, click on Connect.
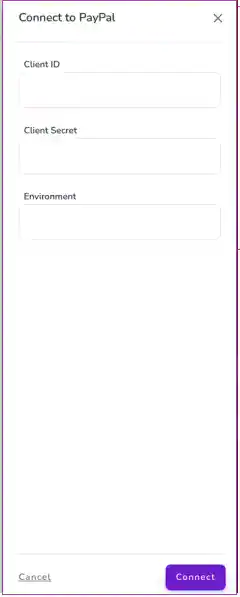
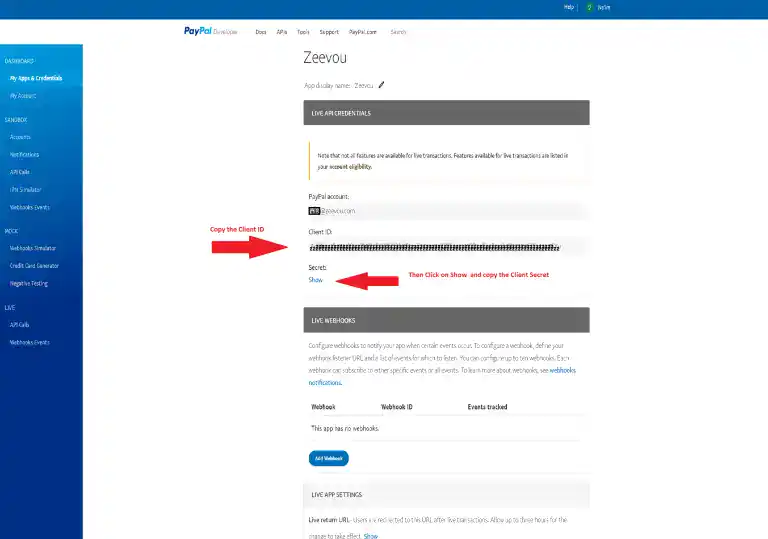
Your PayPal should now be connected.

Note: At the moment, WorldPay Online doesn’t accept any new clients.
There are two ways of integrating with Worldpay. We have a direct integration with Worldpay Online, and allow you to integrate with Worldpay Merchant services through SagePay (see options 1 and 2 below).
1. This is the easiest to use product that Worldpay offer, however it is also the most expensive, charging 2.75% per transaction plus 20 cents. If you decide to use this option, visit this site. After confirming your email, click on Activate on the top right and select “Direct API Integration” under Shopping Cart when prompted. Once set up, make sure to visit Settings > Orders and toggle Authorisations to “Yes”.
Step 1: Log into app.zeevou.com and click on gear sign and select Integrations.
Step 2: Go to Settings > Confirmation Page Settings > Upsells & Payment tab > Payment Methods card and enable the toggle the Card and select the Payment Gateway you have already integrated.
Step 3: Sign in to https//online.worldpay.com/
Step 4: Visit https://online.worldpay.com/settings/keys if using Worldpay Online and copy across the Live Keys.
Step 5: Go to Integrations > Payments >Worldpay.
Step 6: Click on Connect to Worldpay and enter the Service Key and Client Key.
Step 7: Finally, click on Connect.

2. You can make use of cheaper rates as a Merchant Service Provider by opening just a merchant account with WorldPay (not WorldPay Online) and linking that to the Sagepay payment gateway which integrates with Zeevou. SagePay just acts as a bridge between Zeevou and the Merchant Services, and does not process the payments itself. To do so:
a) Call Worldpay on +44 20 3664 2989 and ask them to set you up for e-Commerce and MOTO accounts. Tell them you were referred by Zeevou Ltd, Merchant ID: 1699 6904. You only want to get a Merchant Account through them, not their Payment Gateway, as you’ll be using SagePay as the Gateway.
b) Once WorldPay finalise the process and provide you with a Merchant Number(s), sign up with SagePay by following these steps at and provide them with the Merchant Number(s).
In this step you will create all the automated communications you would like to have with your guests. Below are the most common types of messages that hosts use:
- Welcome message
- Check In instructions
- Check out instructions
- Thank you for booking (Templates)
If you don’t have a prepared text for any of them, we have some samples you can use. Check here.
Creating an Automated Message
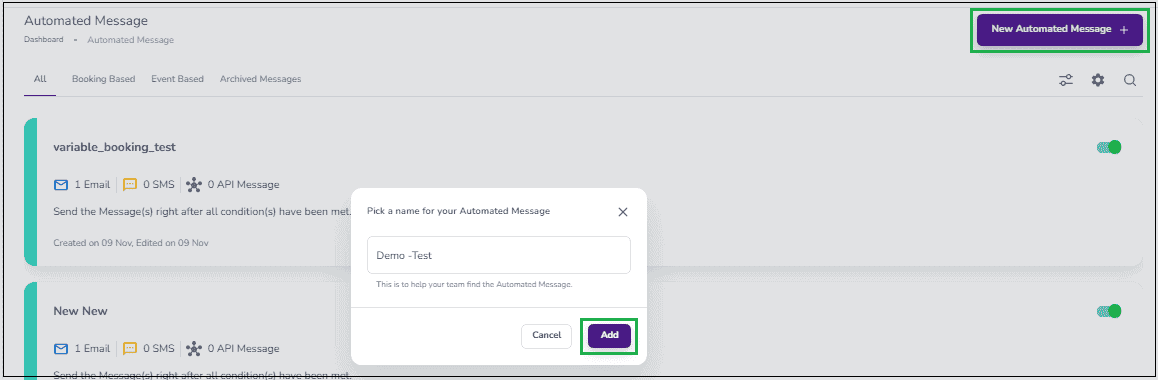
Step 1: Log into app.Zeevou.com. Click on the gear icon on the right. A window pops up in which you can click on Automated Messages and then click on New Automated Message +.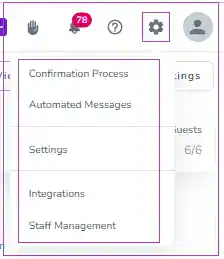
Step 2: Pick a name for your message and click on Add.
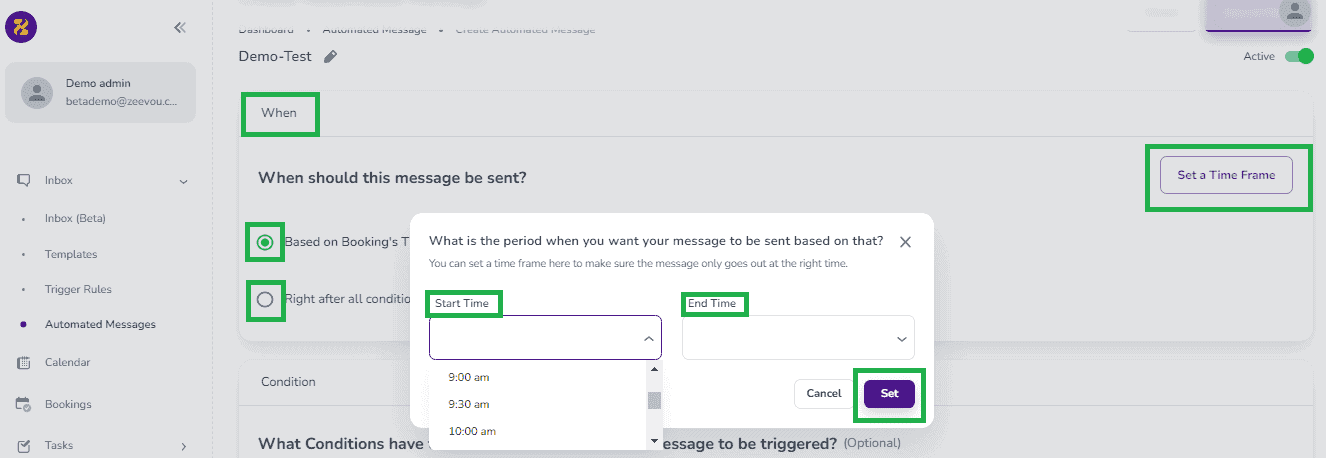
Step 3: To create an automated message, you should set the following criteria:
- When
Your message will be Booking Based if you choose Based on Booking’s Timeline. And, it will be Event Based if you choose Right after all conditions have been met.
Note: For your automated message to be sent during specific hours, you can click on Set a Time Frame and define the Start Time and End Time of your choice. Finally, click on Set.
2. Condition
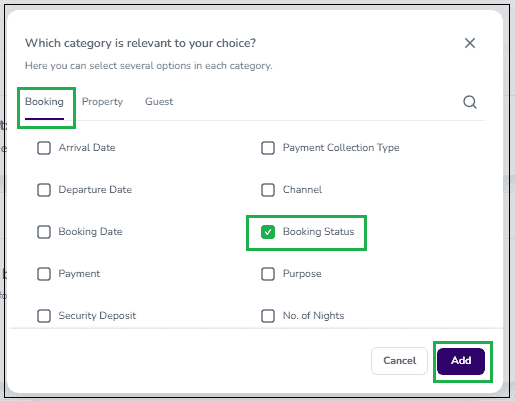
In order for an automated message to be sent for any booking, it must match all of the conditions you set. Click on Add a Condition + to choose the categories (Booking, Property, and/or Guest) relevant to your automated message and the conditions required to trigger it. Once done, click on Add.
Note: You may add more than one condition in more than one category.

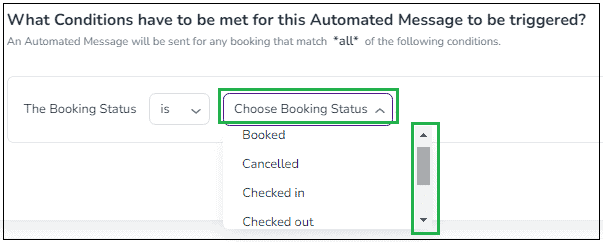
Note: When you add a condition from a category, you can configure it to specify your condition further. For example, if you add Booking Status from the Booking category, you can choose from the list of statuses offered, as shown in the following screenshot:
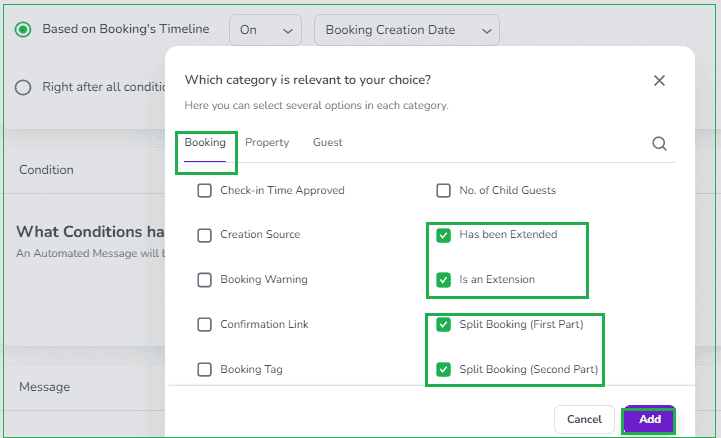
Note: When you want to extend or split your bookings and send an Automated Message for these, you can consider adding Extend or Split Booking in your Conditions. To do so, select the related conditions by ticking their boxes and click on Add.
Note: When you click on each message, it becomes editable. There, you can click on Change History to view change(s).
3. Messages
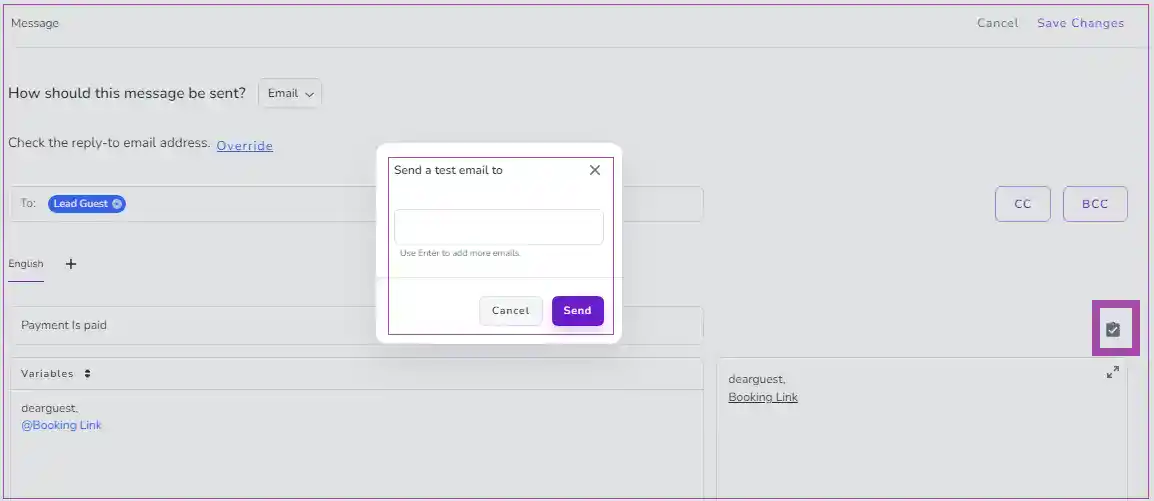
You can decide “How should this message be sent?” by opening the drop-down menu and choosing from Email, SMS, or API Message. You may add the equivalent of your message template in other languages by clicking on Add + in front of English. When you write your message, you can Preview it. The message is in the Plain Text format by default, but you can Switch to HTML to have a Header and Footer.
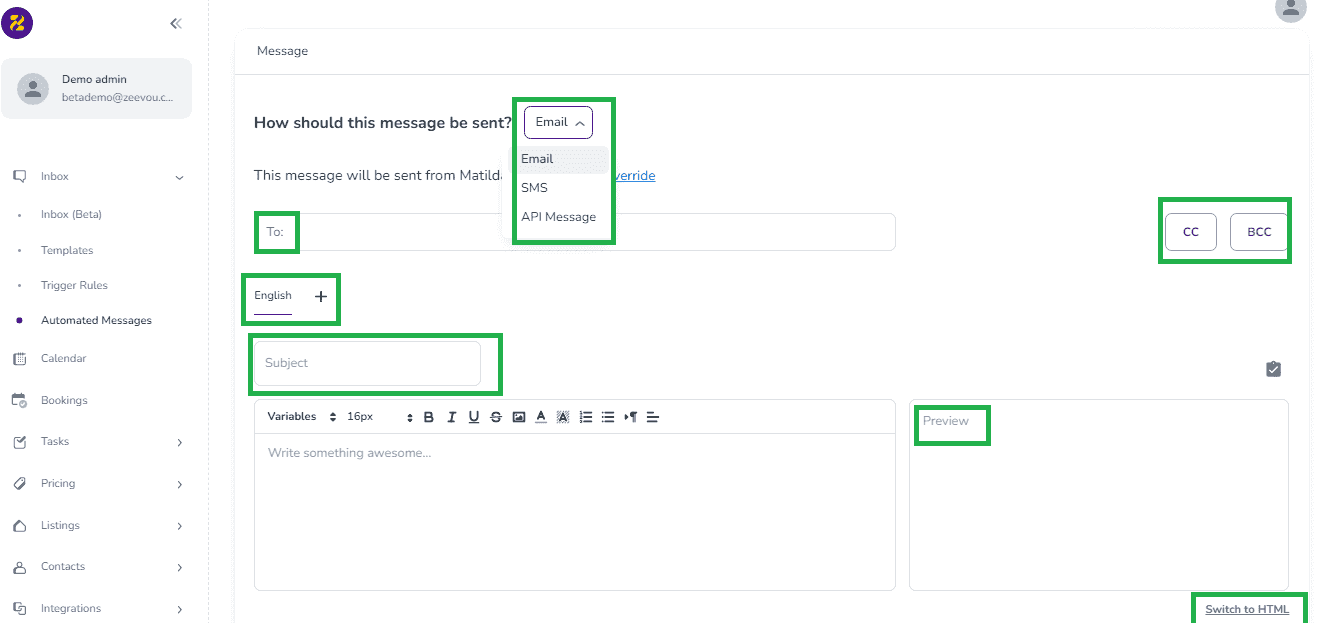
Note: You can click on the tick sign in order to send a test email to yourself to see the result.
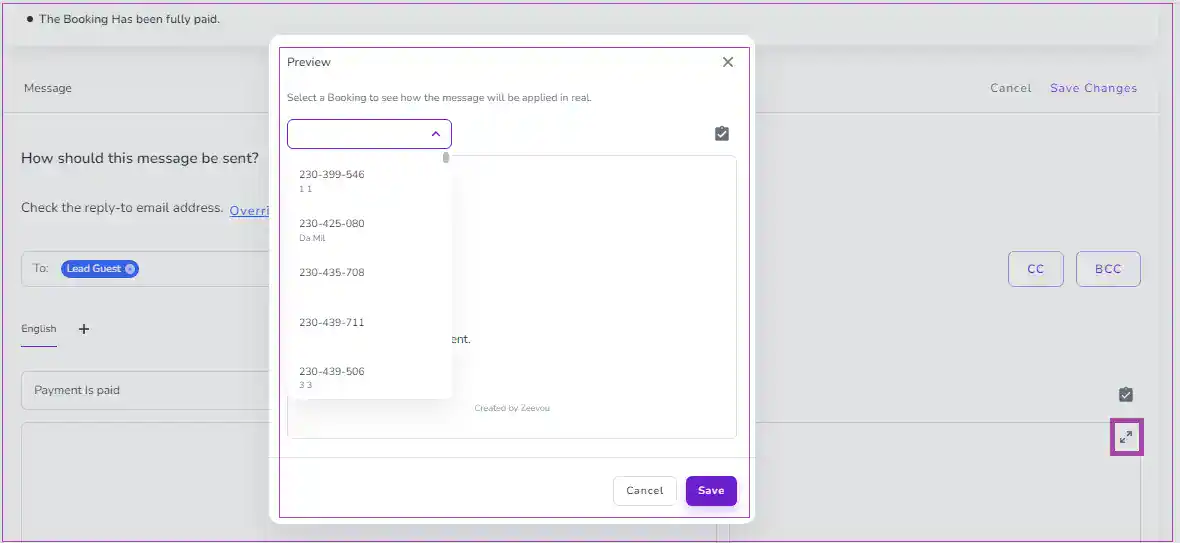
You can also click on the preview to select a Booking to see how the message will be applied in real and click on Save.
Note: You can also Add Attachment or Add Another Message.

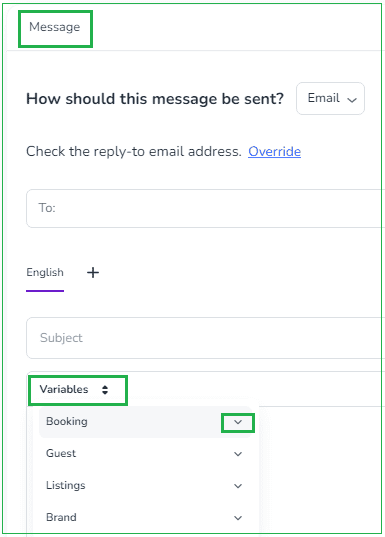
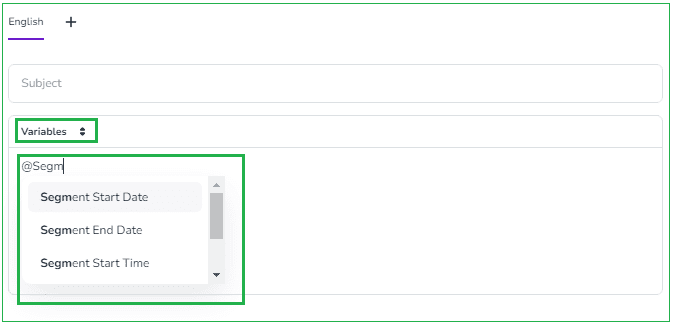
Note: In general, Arrival/Departure variables refer to the arrival date of the first booking and the departure date of the last booking. So, if you would like to point to the specific Arrival/Departure date of the segments of Extend or Split bookings, you can select other variables.
To do so, you can either search the variables by typing @ followed by the keyword of the variable and select it or click on the Variables dropdown and find the variable under its corresponding category. The variables can be Segment Start Date, Segment End Date, Segment Start Time, Segment End Time, and Segment No. of Nights for the Extended or Split bookings.
Step 4: Save and Close. Then, a window pops up to either Activate the message or Save as Inactive.
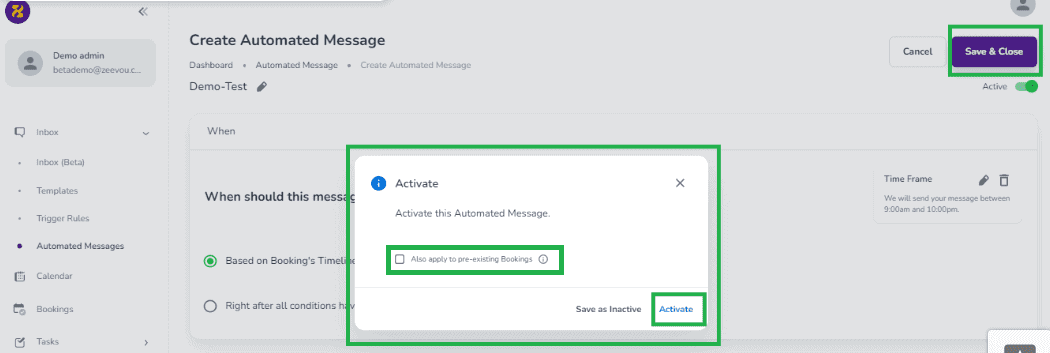
Note: If you tick the box in the pop-up, this message will also apply to Pre-existing Bookings.
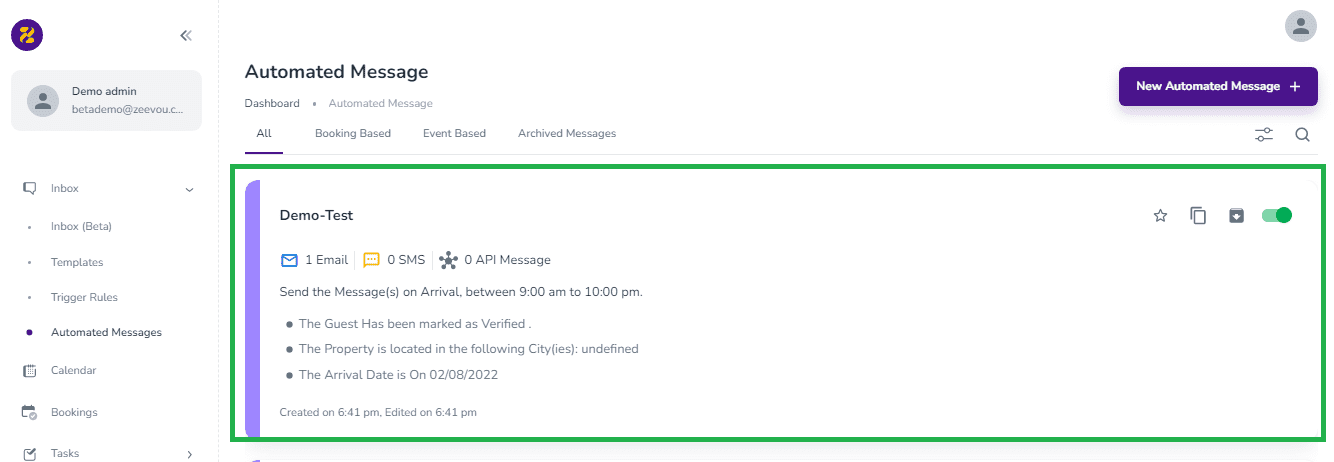
Note: When you click on Activate, your created message will appear in the list of Automated Messages. You can make the created message Inactive by sliding the toggle to left in the top right corner.
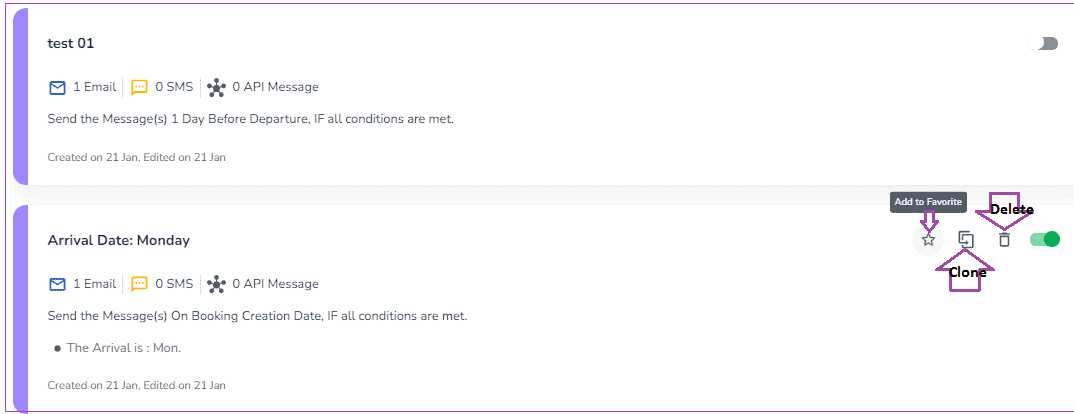
Note: If you hover over any of the created messages you can add it to Favorite by clicking on the star icon, or Clone it by clicking on the icons next to the Star icon. You may delete your message by clicking on the trash bin icon.
If your message which is added to Favorite by clicking on the star icon is archived, it won’t appear when you land on Automated messages.
You can only delete the message that has not been previously used. If it is used before, it can be archived.
Note: The set emails may fail to be sent due to some reasons such as:
- The email address is spelt or formatted incorrectly.
- The owner has removed the email.
- The email is set to be sent at a definite time.
- The system or internet has a problem in sending.
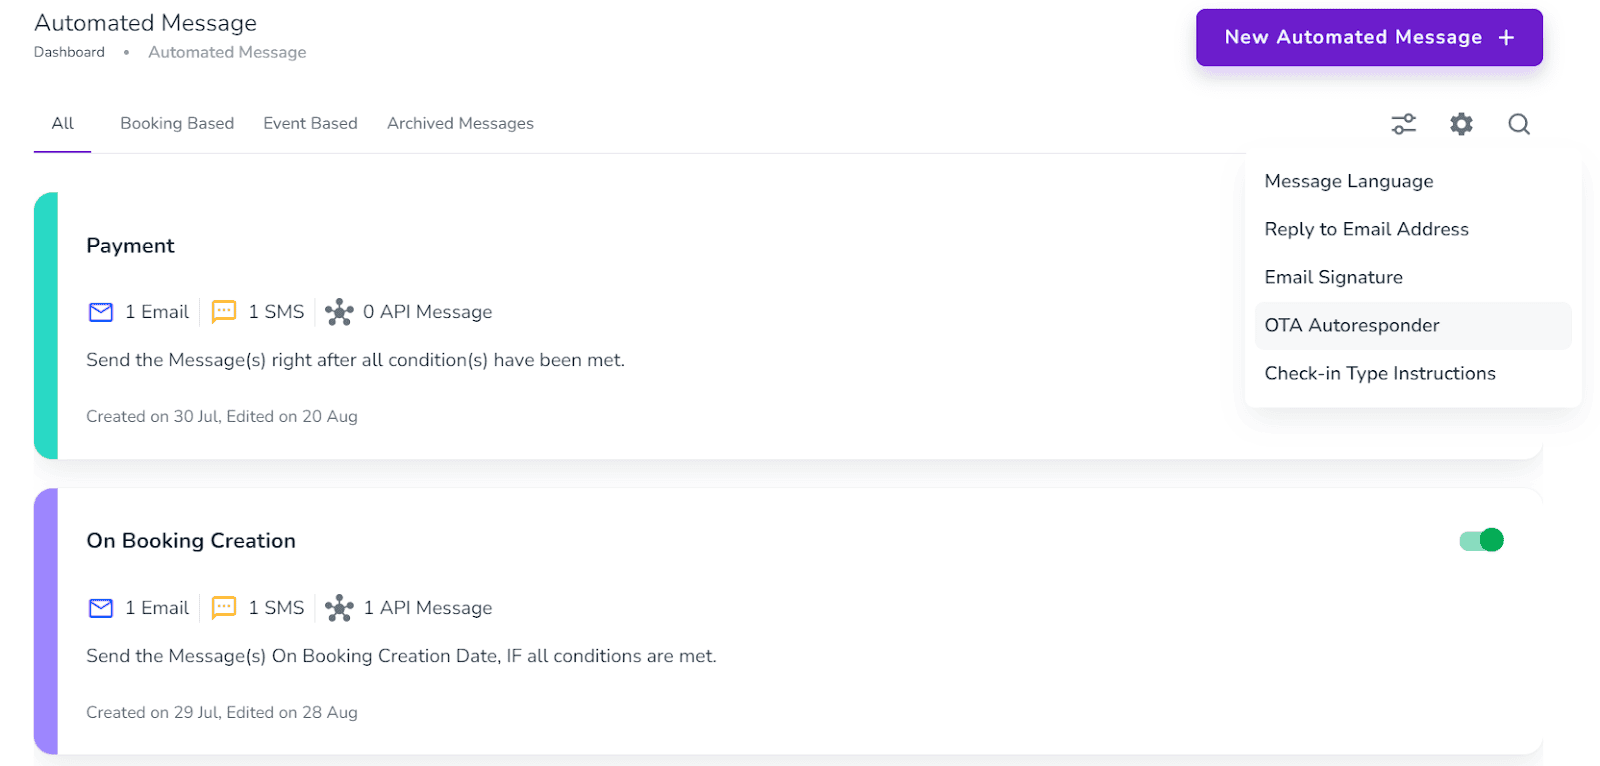
Search, Settings, and Filtering
If you click on the Search icon in the top right corner, a window pops up in which you can search by Subject or Automated name.
If you click on the Settings icon, a window opens and you can make changes in Message Language, Reply to Email Address, Email Signature, OTA Autoresponder, and Check-in Type Instructions.
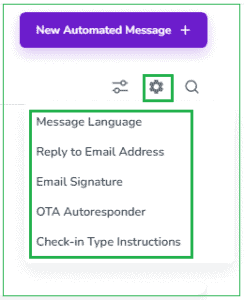
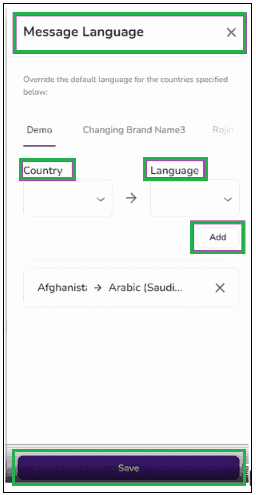
1. Message Language
You can set your guest country and your desired language in your automated message template. If your desired language does not exist, the default language (English) will be overridden.
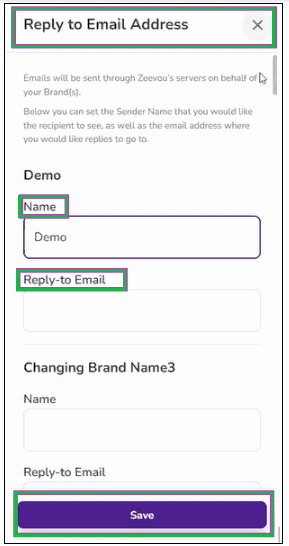
2. Reply to Email Address
You can set the Sender Name that you would like your recipient(s) to see and the Email Address where you would like replies to go to. Finally, Save.
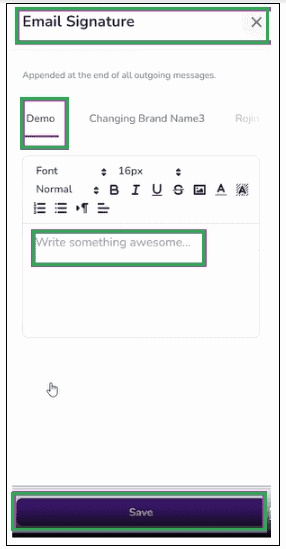
3. Email Signature
You can also set your Email Signature for your Brand(s), and Save it.
4. OTA Autoresponder
In the Automated Messages gear sign, if you click on OTA Autoresponder, you can set Autoresponder details per Brand.
A pop-up appears in which you can select a Brand to Apply changes from the drop-down menu and click on Proceed.
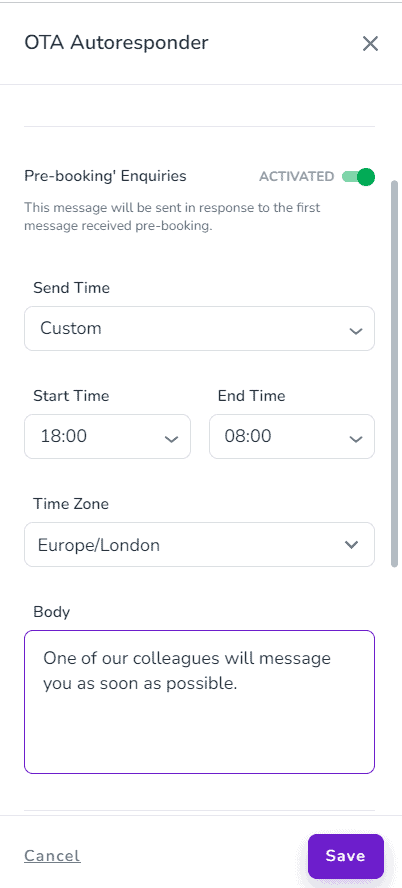
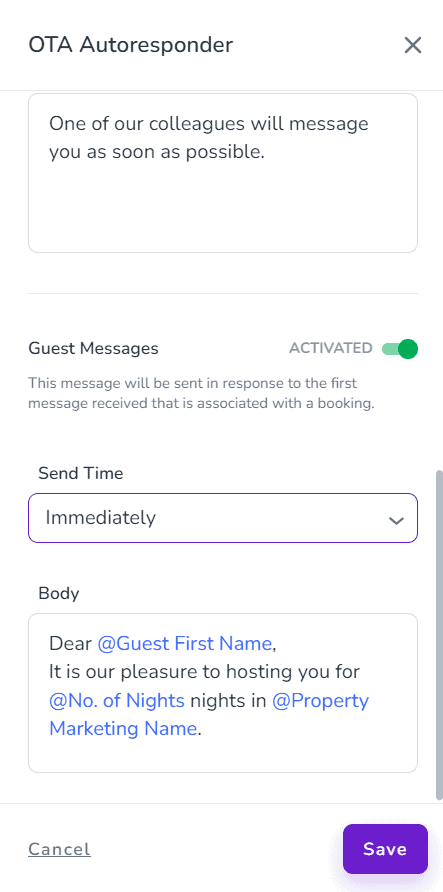
For the OTA Autoresponder, you have two options: one for Pre-booking Enquiries and one for Guest Messages.
If Pre-Booking Enquiries is Activated, the message will be sent in response to the first message received pre-booking.
If Guest Messages is Activated, the message will be sent in response to the first message received that is associated with a booking.
You can choose whether you would like the autoresponder message to be sent Immediately or on a Custom basis. If you select Custom, you should select the Start Time, End Time, and Time Zone. You may prefer to write a general text or use variables in the content of your autoresponder message.
Finally, click on Save and the activated autoresponder will start sending replies to the OTA messages.
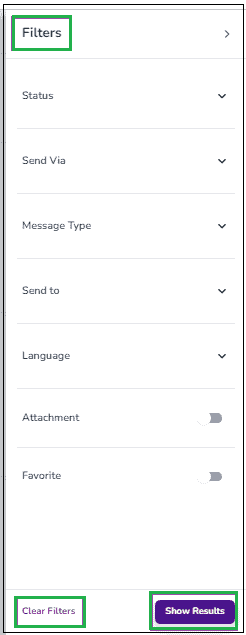
Filtering
You can filter the automated messages by clicking on the Filtering icon next to the Settings Sign. Then, a window pops up in which you may select your desired variables and finally click on Show Results. You can also click on Clear Filters to start a new filter.
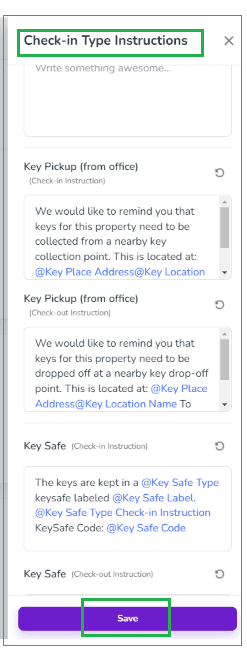
Check-in Type Instructions
When you click on Check-in Type activated autoresponder will start sending replies to the OTA messages. e Instruction, a box opens in which, per check-in type, some check-in and check-out instructions are provided by default. You can change them if you wish. Some related variables are available you may prefer to use. Finally, click on Save.
Watch this tutorial video on how to create a single Automated Message to send out to guests through Email, SMS, or API:
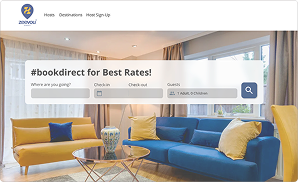
Now it’s time to customise and optimise your Zeevou-powered direct booking website to attract bookings without third-party interference and commission.
1. Check your website URL and change it if you want.
You can set and edit the Website URL and Custom Domain in Domain Settings card Under Site Management tab.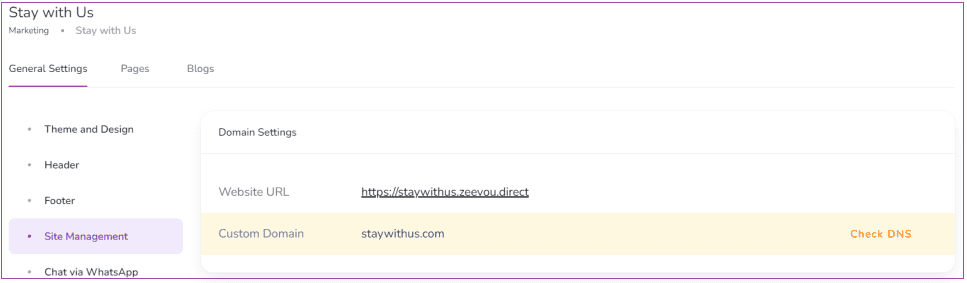
2. Open marketing tab and start designing your website
To design your website, go to Marketing -> General Settings. There are five tabs to view and edit:
- Theme and Design
- Header
- Footer
- Site Management
- Chat Via WhatsApp
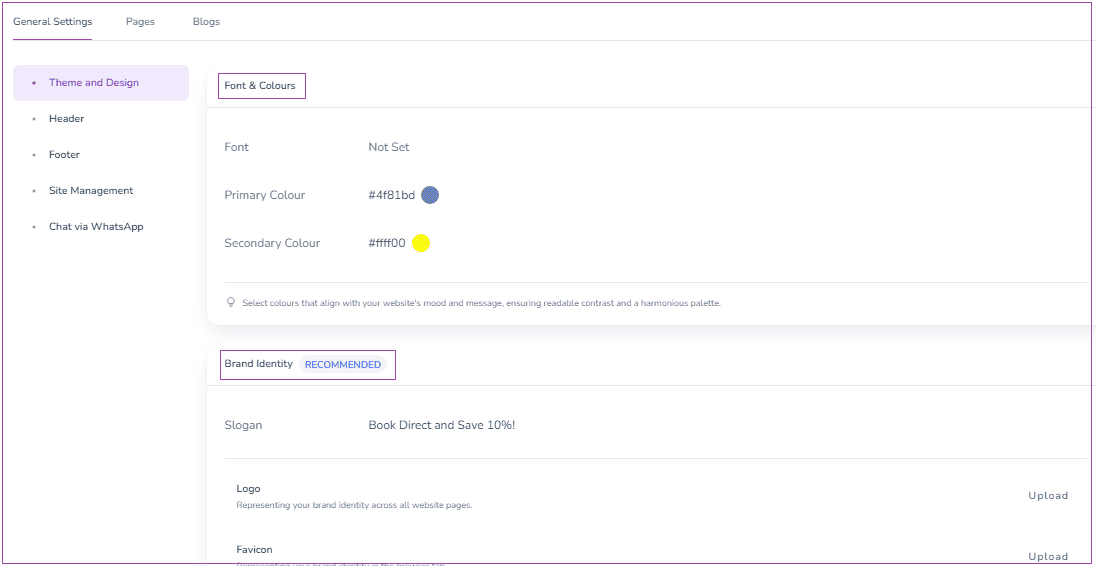
Under the Theme and Design tab, you can view and edit Fonts, Primary Colour, and Secondary Colour in the Fonts & Colours card. Make sure to select colours which align with your website’s mood and message, ensuring readable contrast and a harmonious palette. In the Brand Identity card, you may Add a Slogan and Upload your Logo and Favicon by clicking on their buttons. The Logo represents your Brand Identity across all website pages and the Favion represents your Brand Identity across browser tabs.
In the Header and Footer tab, you can add items to your Header and Footer. There are two ways to Add a Menu Item. By clicking on Add a Menu Item, you can select Add Page or Add Custom URL. Via Add Page, you can add the pages that are already created in the system easily. By Add Custom URL, you can add either Zeevou Pages (that can be added via Add Page more easily), or other pages.
Note that if any of them has already been there, you can edit them by clicking on the pencil.
You can set and edit Website URL and Custom Domain in Domain Settings Under the Site Management tab.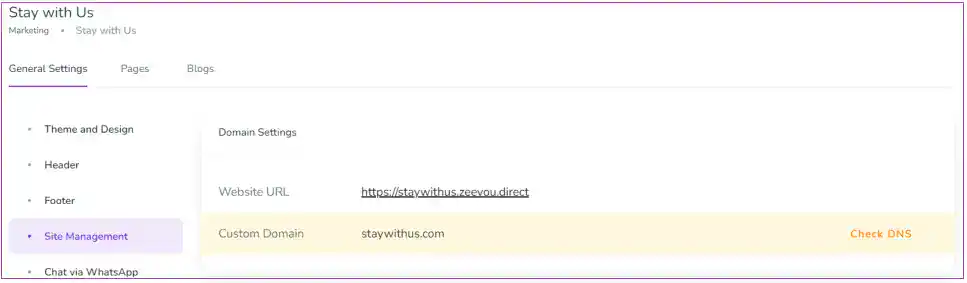
When you turn on the toggle of Chat Via WhatsApp, a widget will be displayed on the bottom right of the website pages, allowing Guests to easily contact you via WhatsApp. To do so, you can add a number under the Contact Details tab in Settings.
Pages
You can click on + New Page to create a new page under the Pages tab. When you click on + New Page, a window appears in which you can insert the Heading and Body and add Featured Image (which is optional). Finally, click on Create and Publish.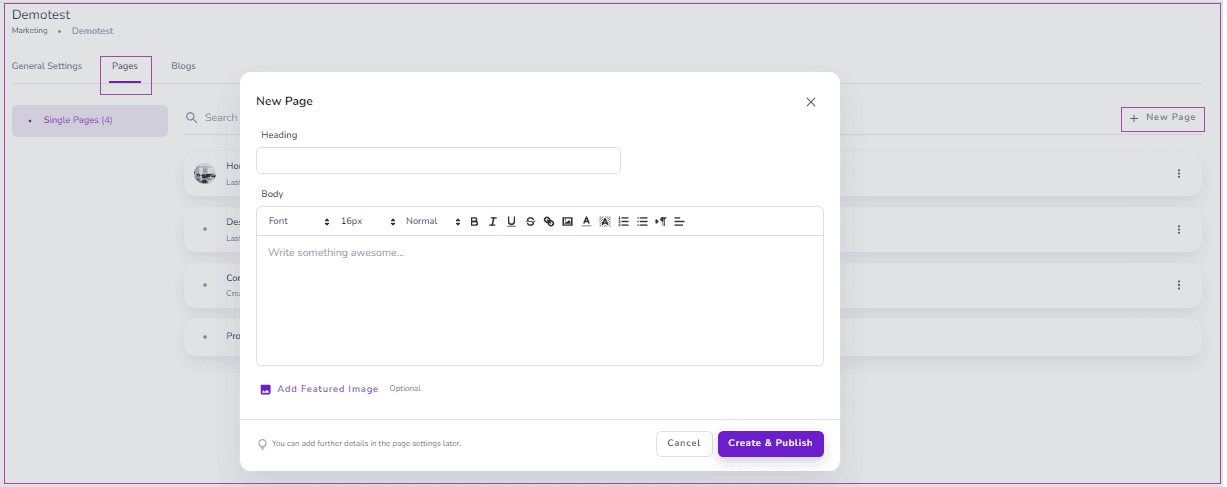
Modify Settings
You can click on the three dots to Modify Settings of each created page.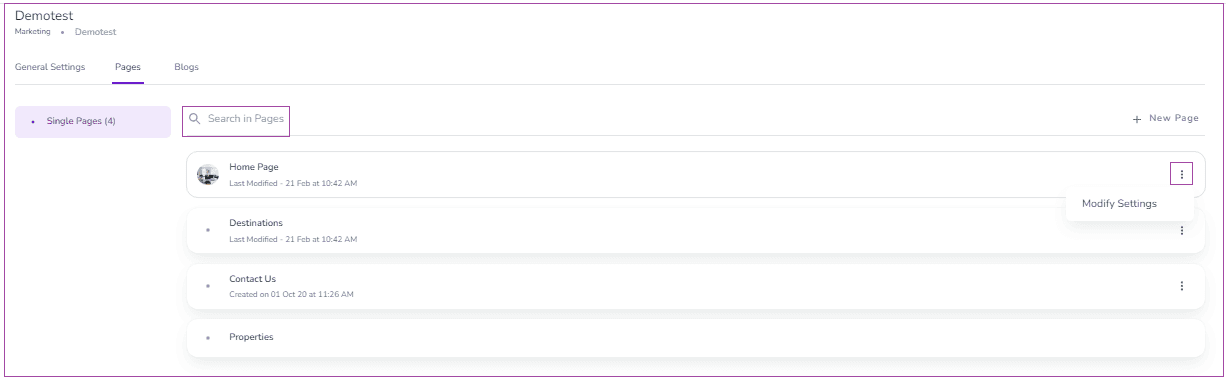
On the opened page, there are three cards of Page Content, Homepage Image and Website Settings.
On the Page Content card, you can click on the pencil to add your desired content and then click on Save.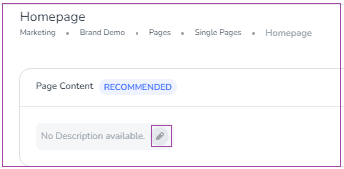
You can click on Upload Images to have more images. You can also delete each image by clicking on the bin icon on each image. If you click on More, you can select Delete All Images to remove all at once. You may drag and drop to reorder the images.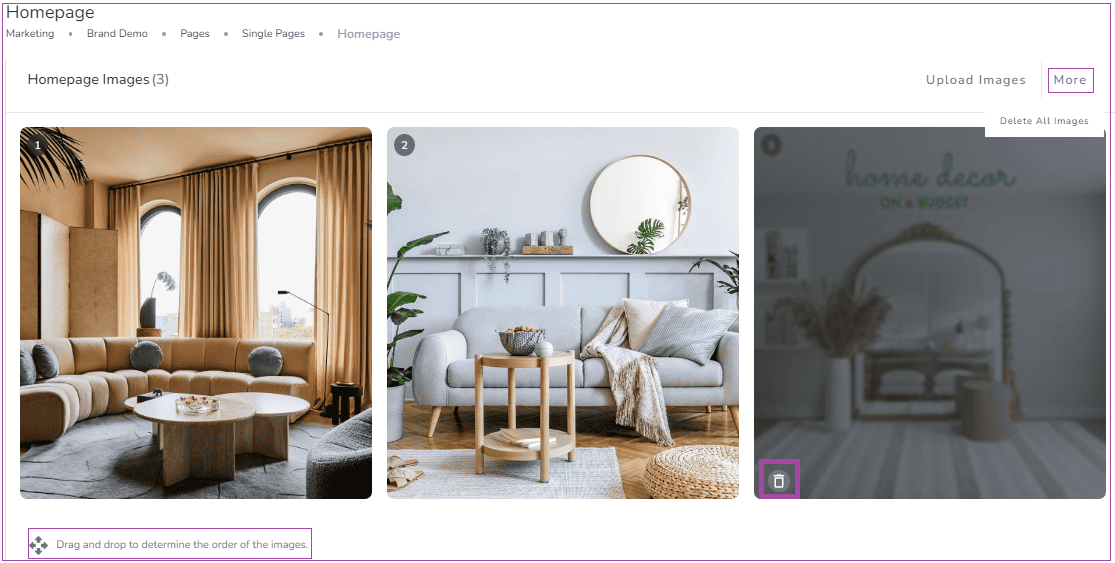
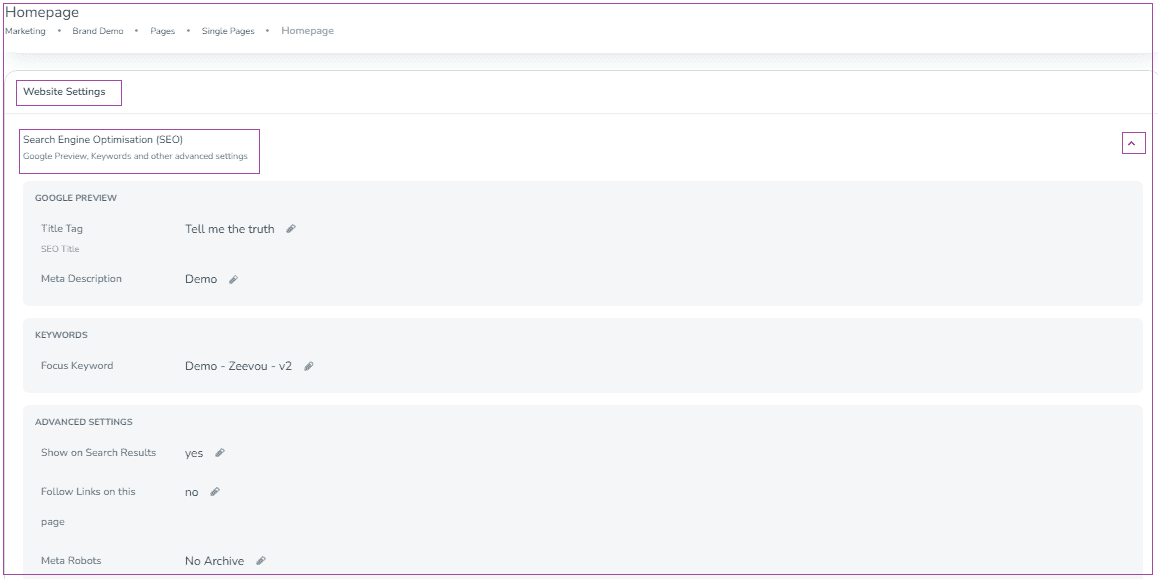
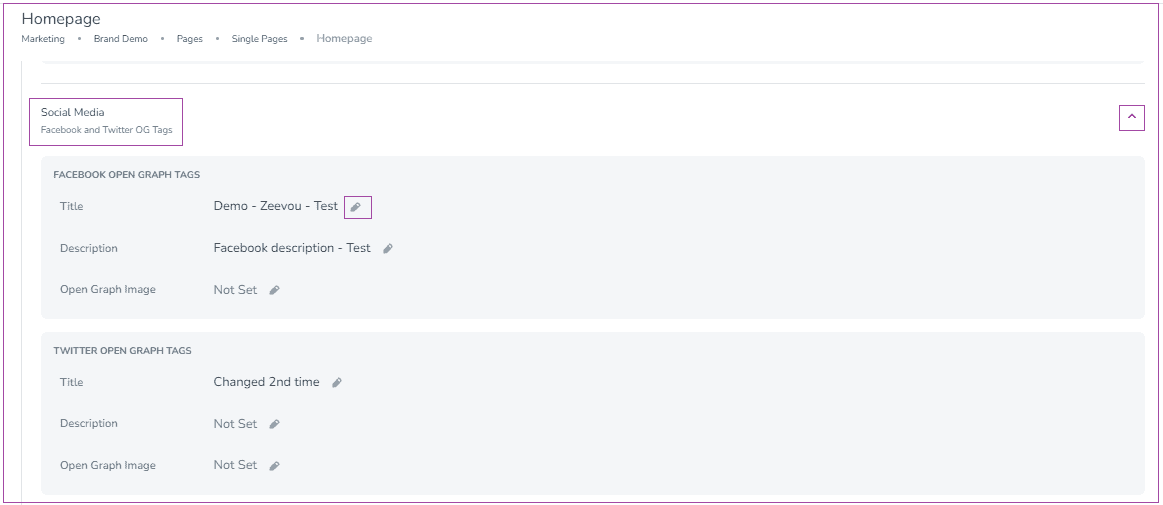
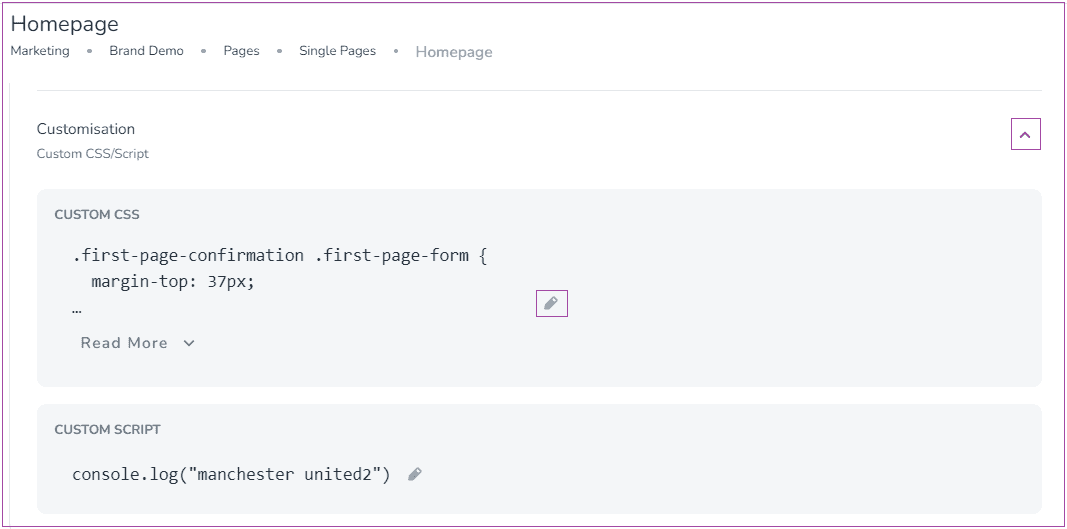
You can find Search Engine Optimisation (SEO), Social Media and Customisation on the Website Settings card. You may click on the arrow in front of each item to edit them by the pencil.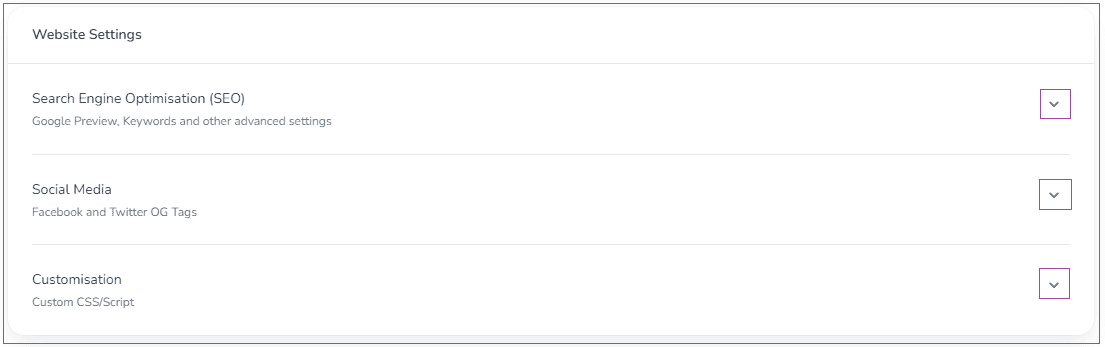
Search Engine Optimisation (SEO)
You can also Search in Pages under the Pages tab.
Blogs
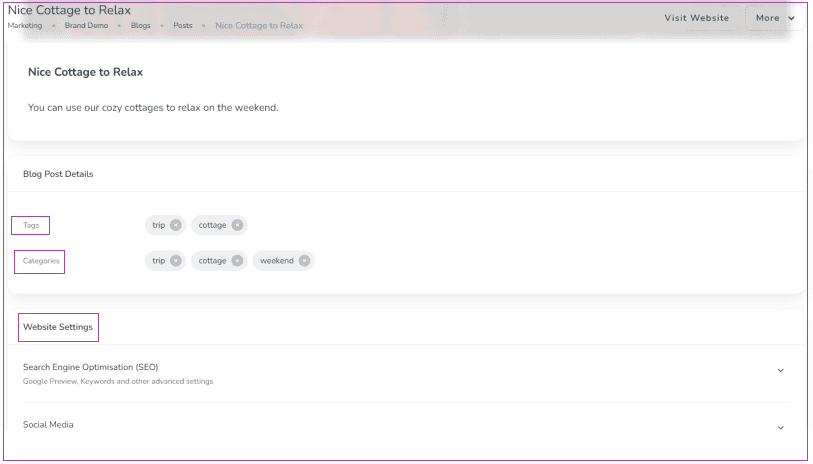
You can edit and view Posts, Categories and Tags under the Blogs tab. For each of these, you can add a new one or modify existing ones. For example, you click on + New Blog Post to have a new post. If you click on the three dots next to each post, you can select to Modify Settings or Delete.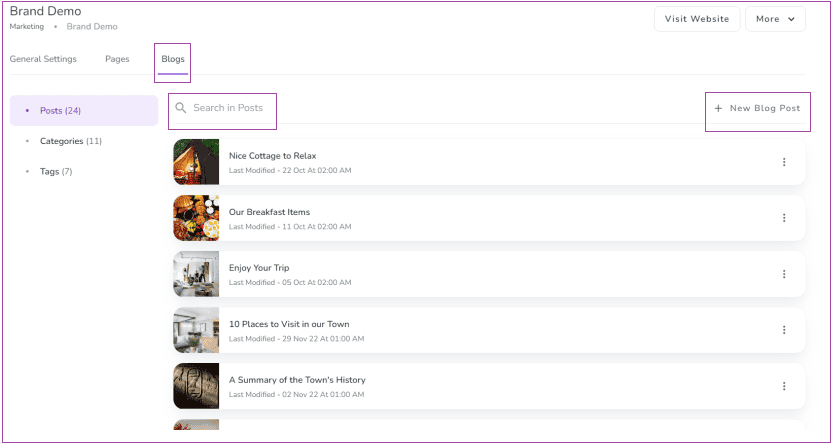
When you click on Modify Settings, you can view and edit Post Content, Blog Post Details and Website Settings, including:
- Search Engine Optimisation (SEO): Google Preview, Keywords and Other Advanced Settings
- Social Media (Facebook and Twitter OG Tags)
- Custom CSS Customisation
Categories
Category is a way of grouping similar topics, making it easier for readers to find related content. It’s like a helpful tag that leads you to more posts on the same subject. You can click on Add Category; a drawer opens in which you can enter your title and click on Create.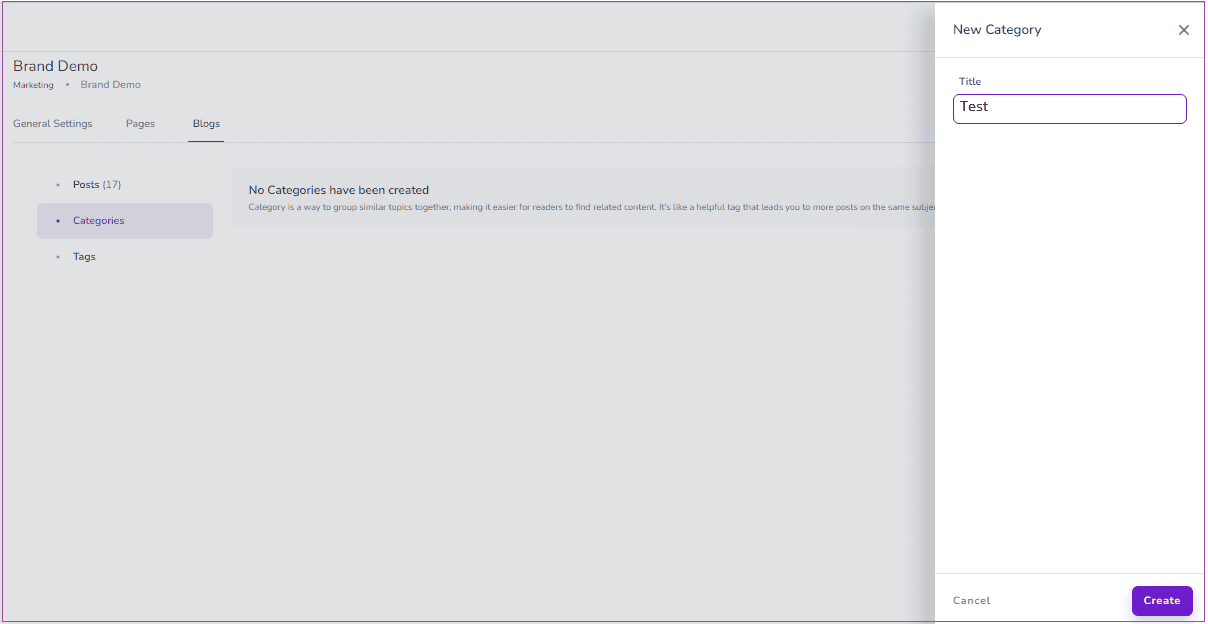
Then, you can click on the three dots in front of the created category to Rename or Delete it.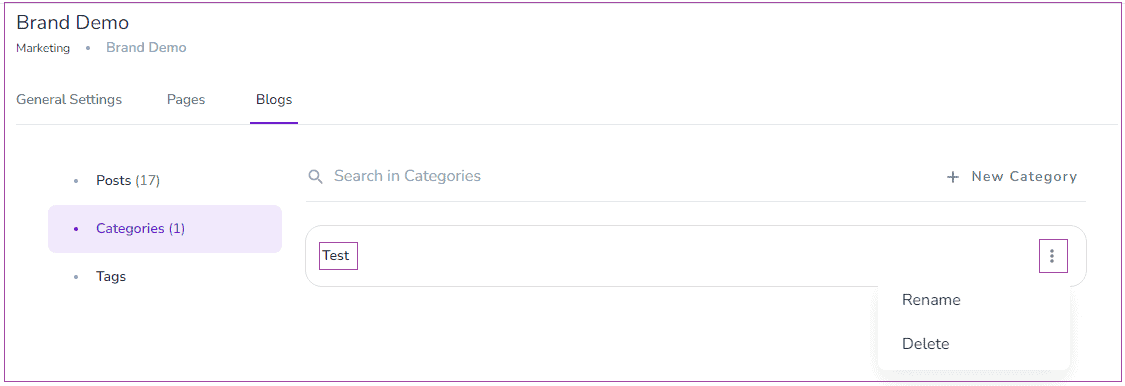
Tags
A tag in a blog is a keyword or label that helps categorise and classify the content. It serves as a way to organise and identify specific topics or themes associated with the blog post. You can click on Add Tag; a drawer opens in which you can enter your title and click on Create.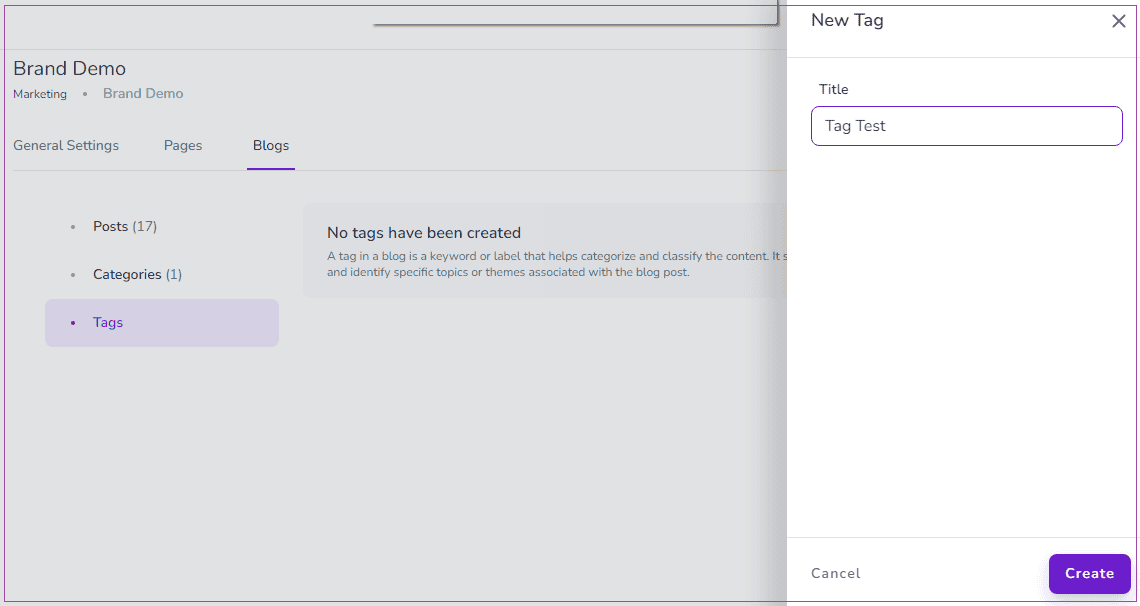
Then, you can click on three dots in front of the created tag to Rename or Delete it.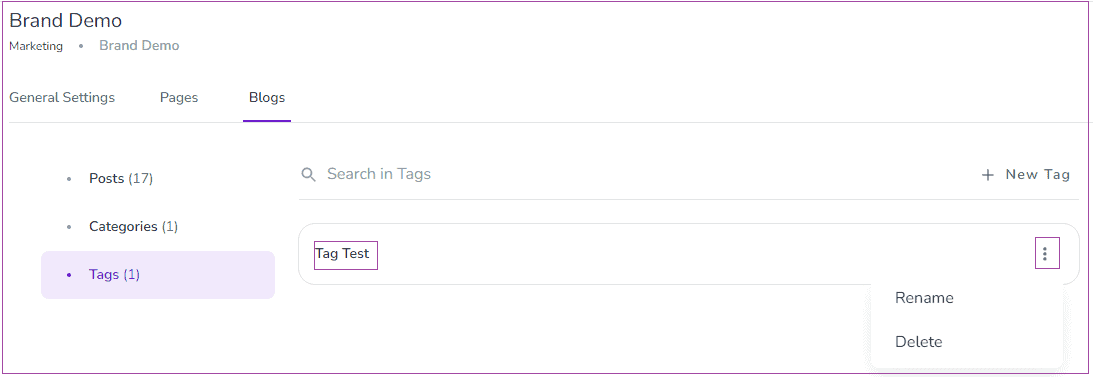
You are all set now and it’s time to test everything.
Create a test booking on your direct booking website and go through all steps of the booking confirmation steps and check the automated messages.
You can check the test booking you just created following this guide. Once you’ve thoroughly inspected everything, you have the option to cancel the test booking, which will then be reflected in the cancelled bookings report. Should you prefer to completely remove the booking, simply Raise a Hand, and our tech team will handle its deletion for you.
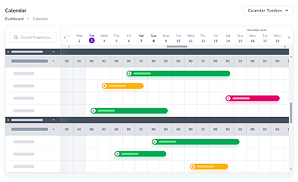
You need to keep your calendars synced to avoid double booking.
1. In the Spark plan you can import your iCal calendars to synchronise your availability calendar.
If you have an iCal link from a third party platform and need to reduce your availability at Zeevou, you can import an iCal link for either a Unit Type or Unit.
Note: Importing an iCal link for a Unit Type will reduce availability for all units of this Unit Type. Importing an iCal link for Unit will only reduce the availability for the specific Unit.
To Import an iCal Link to a Unit Type:
Step 1: Click on Listings.
Step 2: Click on the Unit Type you want to import the iCal link to.
Step 3: Under the Pricing& Availability tab, on iCal Links Card, click on the Import Calendar.
Step 4: Then a window pops up, you should click on Proceed.
Step 5: Then, a drawer opens in which you should select your desired Channel, ical Link, and Description( Optional).
Step 6: Finally, click on Import.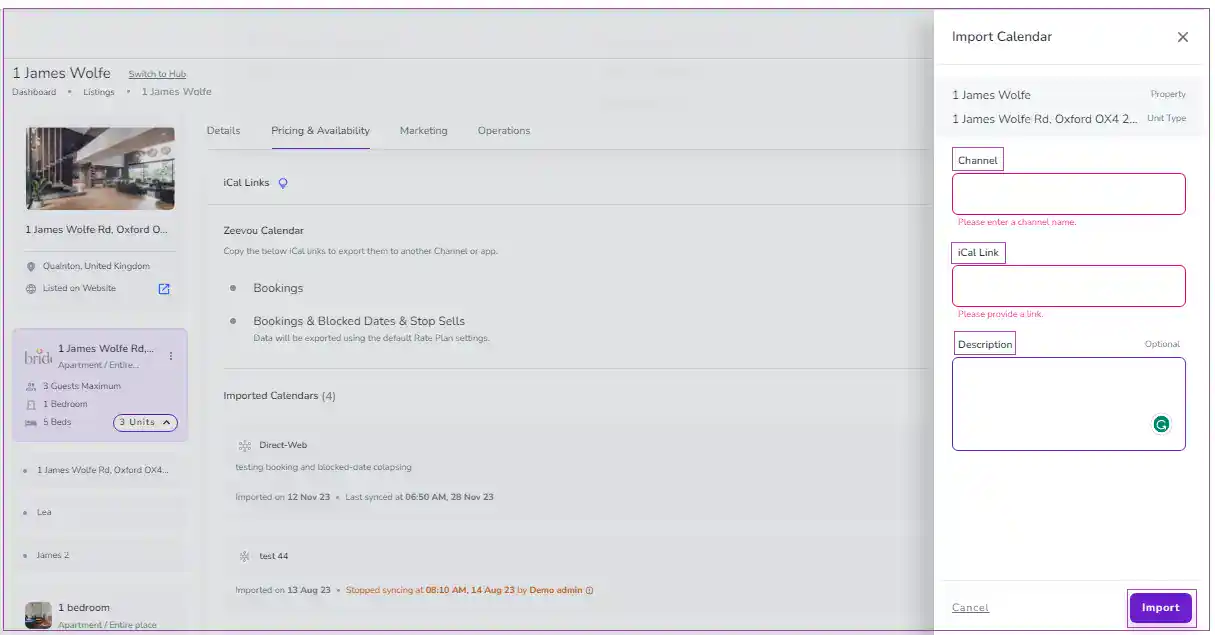
To Import an iCal Link to a specific Unit;
Step 1: Click on Listings and then click on Unit Types.
Step 2: Click on the Unit Type you want to import the iCal link to.
Step 3: Under the Pricing& Availability tab, on iCal Links Card, click on the Import Calendar.
Step 4: Then, a drawer opens in which you should select your desired Channel, iCal Link, and Description (Optional).
Step 5: Finally, click on Import.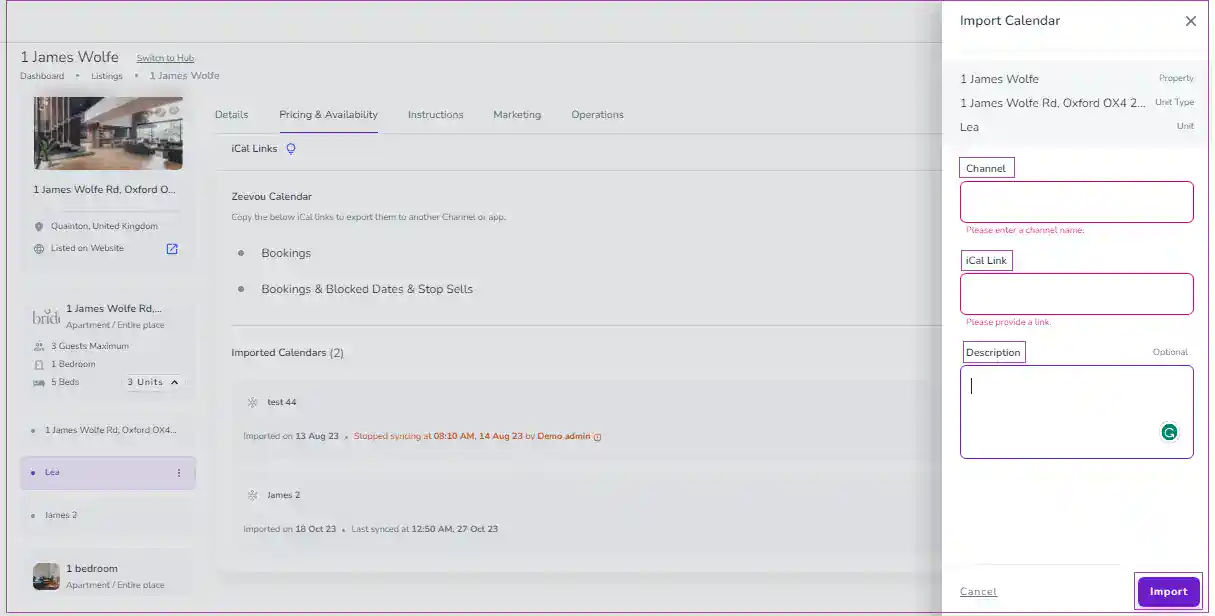
2. In order to connect to a channel that doesn’t support API connection, you need to export the calendar from Zeevou. It should be done via an iCal link. With the iCal link, just the booking will be blocked in the calendar. You can connect to the channel in two levels, either Unit Type or Unit.
To export an iCal link for a Unit Type:
Step 1: Click on Listings.
Step 2: Click on the Unit Type you want to export the availability for.
Step 3: Under the Pricing& Availability tab, on iCal Links Card, click on the Copy ical Link.
Step 4: Paste the copied link in channel you want to export the availability to.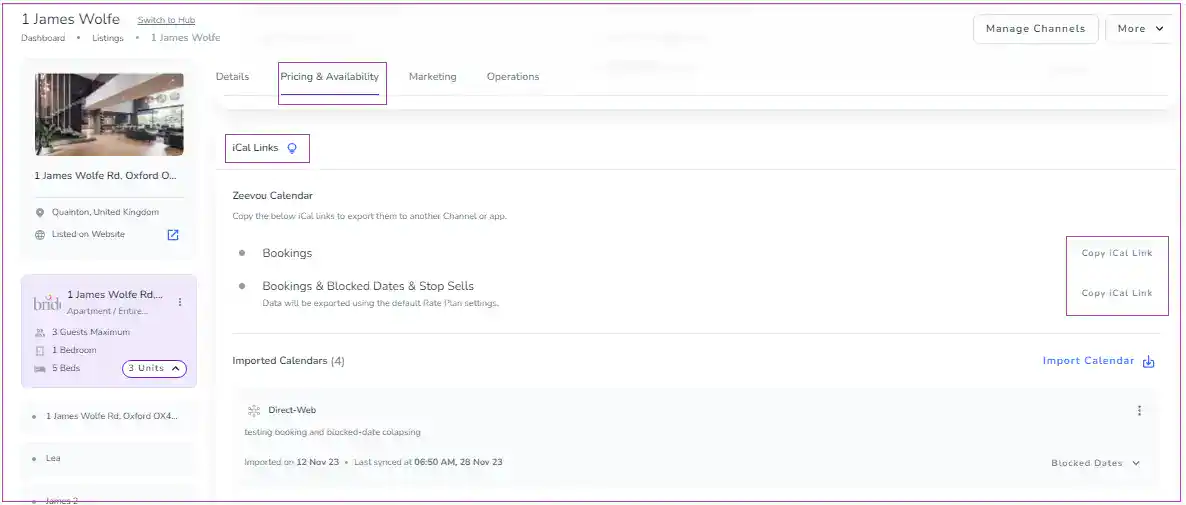
To export an iCal link for a specific unit:
Step 1: Click on Listings and then click on Units.
Step 2: Click on the Unit you want to export the availability for.
Step 3: Under the Pricing& Availability tab, on iCal Links Card, click on the Copy ical Link.
Step 4: Paste the copied link in the channel you want to export the availability to.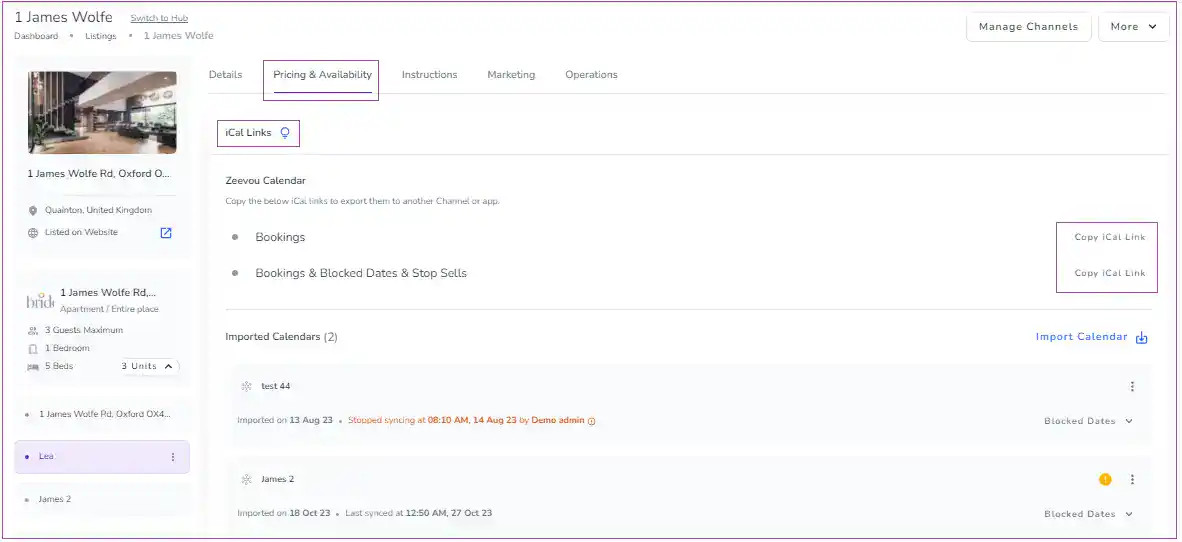
Note that each iCal link includes some details, including the start and end dates and times for all events; the data listed below will also be added as text or summary to each event.
Bookings: Booking Number, Unit, Listing Address, Number of Guests, Channel, Booking Link on Zeevou, and Booking Link on Channel, the start and end dates and times
Blocked Dates: Block Type, Unit, and Listing Address
Explore our Support website for in-depth setup guides and advanced configurations. Here are some samples of commonly accessed help articles to get you started:
